Policy Settings
Configure blocking policies to protect the NetFUNNEL server from excessive traffic control API requests. These settings determine when and how to block malicious attempts to acquire entry keys.
How Repeated Request Block Works
When someone exceeds the configured limits (too many requests per second or per interval), the NetFUNNEL server applies Repeated Request Block to their requests. Think of it like a security guard stopping someone who's trying to enter too many times.
This feature protects the NetFUNNEL server from excessive traffic control API requests (Initial Entry Request, Re-entry Request, Alive Notice Request, Complete Request), not your customer service endpoints.
Block Activation
Repeated Request Block activates when a request exceeds either:
- Limit per interval: More requests than the Limit per interval setting allows within the Detecting Interval window
- Limit per second: More requests than allowed in a single second
The moment a request exceeds the limit, Repeated Request Block is immediately activated for that IP/ID.
Block Duration
Once activated, Repeated Request Block remains active for the configured block time (e.g., 20 seconds). During this period:
- ALL requests from that IP/ID are blocked, regardless of count
- The NetFUNNEL server returns status code 302 (Macro Block) for every request
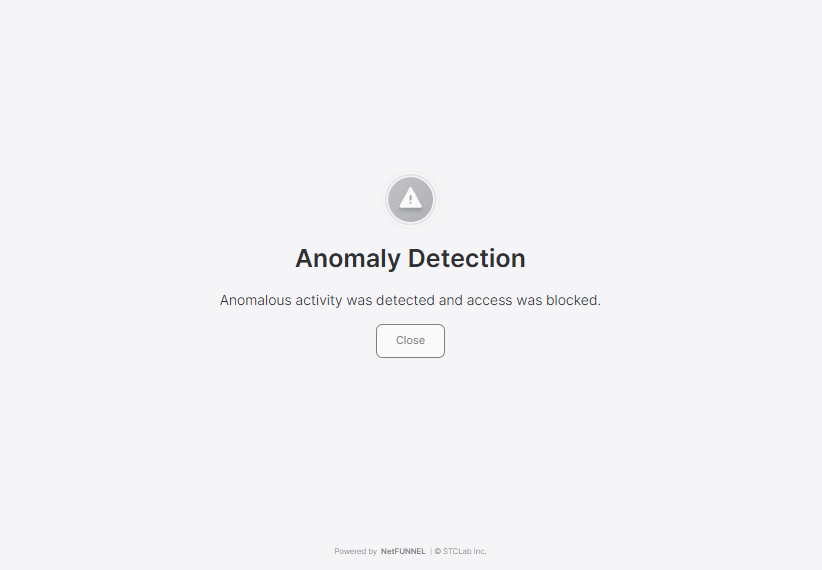
- When the NetFUNNEL agent receives a 302 block response, it displays the Repeated Request Block page to the user
Block time is absolute: Even if you send just 1 request during the block period, it's still blocked.
Block Expiration and Re-triggering
After the block time expires, the IP/ID can make requests again. However:
- If they exceed the limits again, Repeated Request Block is immediately re-activated
- A new block time period starts from that moment
- This cycle continues: exceed limit → block → wait → try again → exceed limit → block again
Example: If block time is 20 seconds and someone keeps sending excessive requests, they'll be blocked repeatedly: blocked for 20s → try again → blocked again for another 20s → and so on.
Activating Repeated Request Block
To activate Repeated Request Block, follow these steps:
- From the home screen, click the button to access Repeated Request Block settings.

- Select Policy Settings from the menu (the first menu option).

- On the Policy Settings page, set the Activate Repeated Request Block toggle to ON.
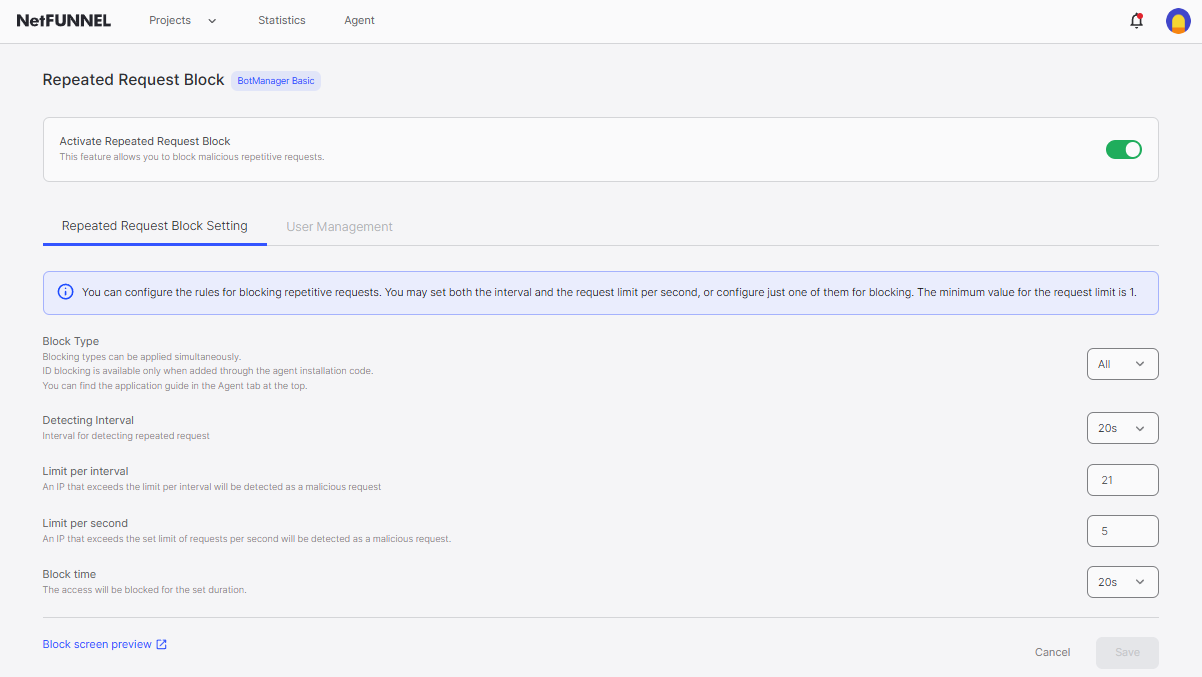
Note: Repeated Request Block settings are global configuration that applies to all projects.
Default Settings
The default configuration provides balanced protection:
| Setting | Value | What It Means |
|---|---|---|
| Block Type | All | Blocks by both IP and user ID |
| Detecting Interval | 20 seconds | Checks for repeated requests every 20 seconds |
| Limit per interval | 21 | Maximum requests allowed in 20 seconds |
| Limit per second | 5 | Maximum requests allowed per second |
| Block time | 20 seconds | Duration of block when limit exceeded |
In simple terms: If someone sends more than 5 requests per second OR more than 21 requests in 20 seconds, they're blocked for 20 seconds.
Policy Settings

Block Type
Determines how to identify who's making excessive requests.
| Option | Description | When to Use |
|---|---|---|
| IP | Blocks based on IP addresses | Always available. Basic protection |
| ID | Blocks based on user IDs | Only when user IDs are set up in agent code. More precise |
| All | Uses both IP and ID together | Maximum security. Recommended |
Note: ID blocking requires user IDs added through agent installation code. See the Agent Installation documentation.
Precautions: Changing block types may initialize existing lists. Check or backup lists before changing.
Detecting Interval and Limit per Interval
These two settings work together as a pair. Detecting Interval defines the time window, and Limit per interval sets the maximum number of requests allowed within that window.
Detecting Interval
Defines the time window for detecting repeated requests.
- Range: 5 - 20 seconds (in 5-second increments)
- Default: 20 seconds
| Interval | Best For |
|---|---|
| 5-10 seconds | Quick response needed (uses more resources) |
| 10-15 seconds | General use (balanced) |
| 15-20 seconds | Accurate detection (recommended, default) |
Limit per Interval
Maximum requests allowed within the detecting interval window.
- Minimum: Greater than detecting interval (in seconds)
- Maximum: 99999
- Default: 21
How they work together: If Detecting Interval is 20 seconds and Limit per interval is 21, the system checks every 20 seconds and allows up to 21 requests within each 20-second window.
Example: With 20-second detecting interval and limit of 21:
- ✅ 20 requests in 20 seconds → OK
- ✅ 21 requests in 20 seconds → OK (at limit)
- ❌ 22 requests in 20 seconds → BLOCKED
Why minimum must exceed interval? If interval is 20 seconds and limit is 20, someone could send exactly 1 request per second (normal). Setting limit to 21+ catches faster patterns.
Limit per Second
Maximum requests allowed in a single second.
- Minimum: 1
- Default: 5
Example: With limit of 5:
- ✅ 1-5 requests per second → OK
- ❌ 6+ requests per second → BLOCKED
| Value | Strictness | Impact |
|---|---|---|
| 1-3 | Very strict | May block legitimate users |
| 4-10 | Balanced | Default recommended |
| 10+ | Loose | Some attacks may pass through |
Effective against: Burst attacks where attackers flood the server with many requests in a very short time.
Limit Strategy
You can set both limits or just one:
- Set Both: Stricter blocking, recommended for better protection
- Set One Only: When focusing on specific attack patterns
If both are set, a request must pass both checks to be allowed.
Block Time
How long to block someone when they exceed limits.
- Range: Any duration (seconds, minutes, hours)
- Default: 20 seconds
| Duration | Use Case |
|---|---|
| 20 seconds - 1 minute | Quick timeout for minor violations |
| 5-30 minutes | Medium penalty for repeated violations |
| 30 minutes - 24 hours | Long penalty for serious attacks |
| Permanent | Use Blacklist feature instead |
Important: During block time, ALL requests are blocked, regardless of count.
Block Screen
When a NetFUNNEL agent receives a 302 block response from the server due to Repeated Request Block, it automatically displays the Repeated Request Block page to the user.
Important differences from Block Room:
| Feature | Repeated Request Block Page | Block Room |
|---|---|---|
| Trigger | Repeated request blocking (automatic) | Segment entry mode set to "block" |
| Customization | ❌ Not customizable in NetFUNNEL console | ✅ Fully customizable via Easy Editing or Code Editor |
| Purpose | Shows when excessive API requests are detected | Shows when segment is configured to block entry |
Note: The Repeated Request Block page UI cannot be customized through the NetFUNNEL console. It is a fixed interface that displays automatically when the agent receives a 302 block response.
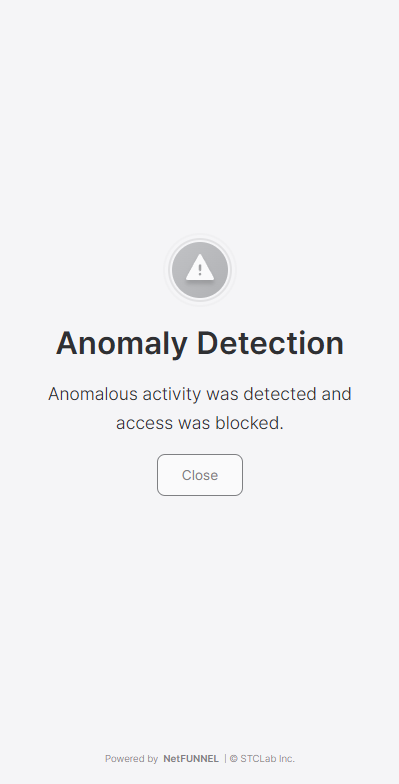
Desktop view:
Mobile view:
How It Works
Example 1: Limit per Interval
Setting being demonstrated: Limit per interval
Configuration used:
- Limit per interval: 21
- Block time: 20 seconds
Test scenario: Continuously send requests at a rate of 30 requests per 20 seconds (exceeds limit of 21)
What happens:
- Requests 1-21: ✅ Allowed (within limit)
- Request 22: 🚫 BLOCKED (exceeded limit)
- Requests 23-30: 🚫 BLOCKED (still in block period)
After 20 seconds (block time expires):
- New requests are allowed again
- But if you exceed limit again, blocked again
Example 2: Limit per Second
Setting being demonstrated: Limit per second
Configuration used:
- Limit per second: 5
- Block time: 20 seconds
Test scenario: Continuously send 10 requests per second (exceeds limit of 5)
What happens:
- Requests 1-5: ✅ Allowed (within limit)
- Request 6: 🚫 BLOCKED (exceeded limit)
- Requests 7-10: 🚫 BLOCKED (still in block period)
For next 20 seconds: All requests blocked (block time)
After 20 seconds: Can send 5 requests successfully, but 6th request triggers block again
Best Practices
Start with Default Settings
Begin with the default configuration and monitor its effectiveness:
- Default settings provide balanced protection for most use cases
- Monitor blocking statistics for a few days before making adjustments
- Observe patterns in blocked requests to understand your traffic
Gradual Adjustment
Adjust settings incrementally based on monitoring data:
- Apply initial settings - Start with defaults
- Monitor and collect data - Track blocking statistics and patterns
- Identify issues - Look for false positives (legitimate users blocked) or missed attacks
- Adjust incrementally - Make small changes, not drastic modifications
- Re-evaluate - Monitor the impact of changes before making further adjustments
Block Type Selection
Choose the appropriate block type based on your needs:
- IP only: Basic protection, always available
- ID only: More precise when user IDs are configured in agent code
- All (IP + ID): Maximum security, recommended for most cases
Note: Changing block types may initialize existing lists. Check or backup lists before changing.
Limit Configuration
Configure limits based on your traffic patterns:
- Set both limits (per interval and per second) for comprehensive protection
- Limit per interval: Catches sustained attacks over time
- Limit per second: Catches burst attacks in short periods
- Ensure Limit per interval is greater than Detecting Interval (in seconds) to catch faster patterns
Block Time Considerations
Set block time based on violation severity:
- Short (20 seconds - 1 minute): Quick timeout for minor violations
- Medium (5-30 minutes): Appropriate penalty for repeated violations
- Long (30 minutes - 24 hours): Severe penalty for serious attacks
- Permanent blocks: Use the Blacklist feature instead of very long block times
Monitoring and Maintenance
Regularly review and maintain your Repeated Request Block configuration:
- Monitor blocking statistics to ensure effectiveness
- Check for legitimate users being blocked (false positives)
- Review blocked IPs/IDs in User Management regularly
- Adjust settings based on changing traffic patterns or attack types