Code-based Integration
Control traffic at the button/API level by calling NetFUNNEL functions in your application code.
This is one of two integration methods available. See the Integration Methods Overview to compare with URL-Triggered Integration and choose the best approach for your use case.
How It Works
User Experience:
- User clicks button or triggers action
- Modal waiting room opens on current screen
- When entry allowed, modal closes and service continues
Best For:
- Button click protection (login, checkout, order)
- API call throttling
- Precise control over specific actions
- Multi-step flows with consistent concurrency
Prerequisites
- Installation & Initialization completed
- NetFUNNEL console access
- JavaScript development environment
This guide uses a sample application to demonstrate code-based integration patterns. Your actual application code will differ from the examples shown. Focus on understanding the integration concepts and adapt the patterns to your specific codebase, function names, and business logic.
💡 Practice Template: Check out our Sample Projects for a Web Application (Vanilla JavaScript MPA) template ready for NetFUNNEL integration practice.
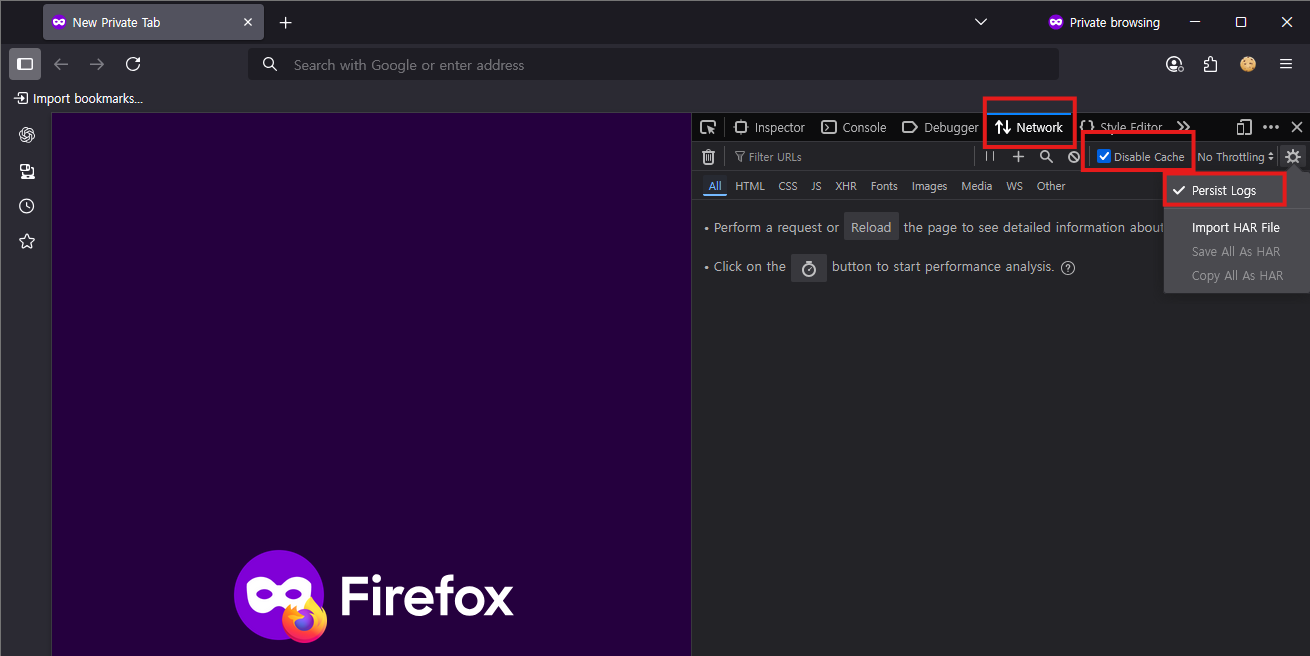
Step 1: Prepare Testing Environment
Browser Setup:
- Use Firefox (recommended) or Chrome/Edge/Safari
- Firefox Private mode recommended for clean testing
DevTools Configuration:
- Open DevTools:
F12(Windows) or⌘⌥I(macOS) - Network tab settings:
- ✅ Preserve log or Persist Log
- ✅ Disable cache
Step 2: Verify Agent Installation
Confirm the NetFUNNEL agent loads correctly by checking for these files with HTTP 200:
netfunnel-javascript-agent.jsnf-setting.json
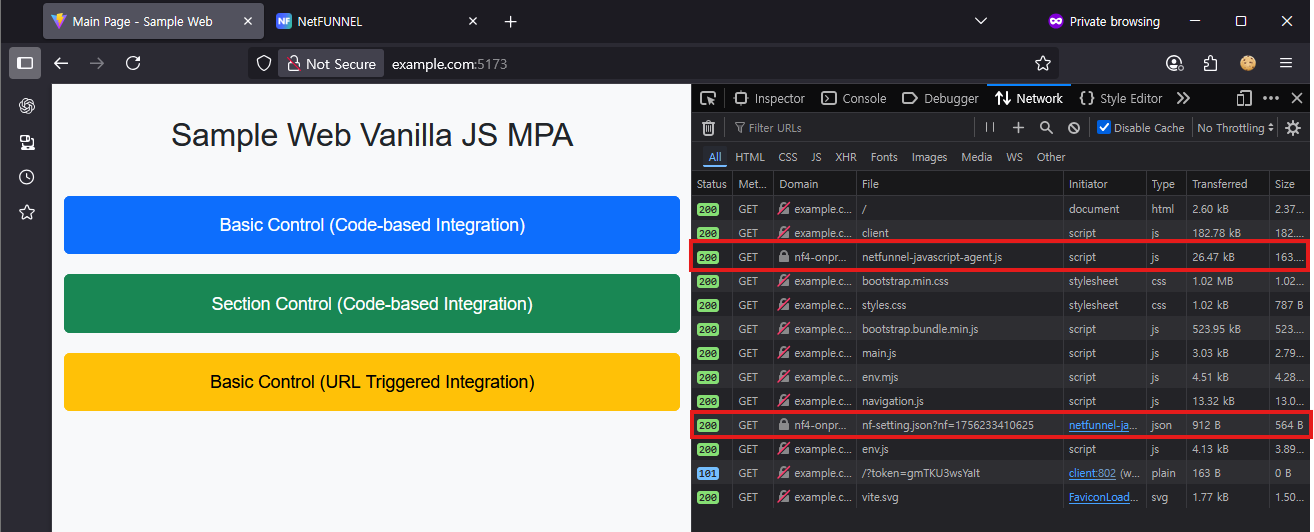
If these files are not loading with HTTP 200 status, the NetFUNNEL agent is not properly installed. Please return to the Installation & Initialization guide and complete the setup process before proceeding.
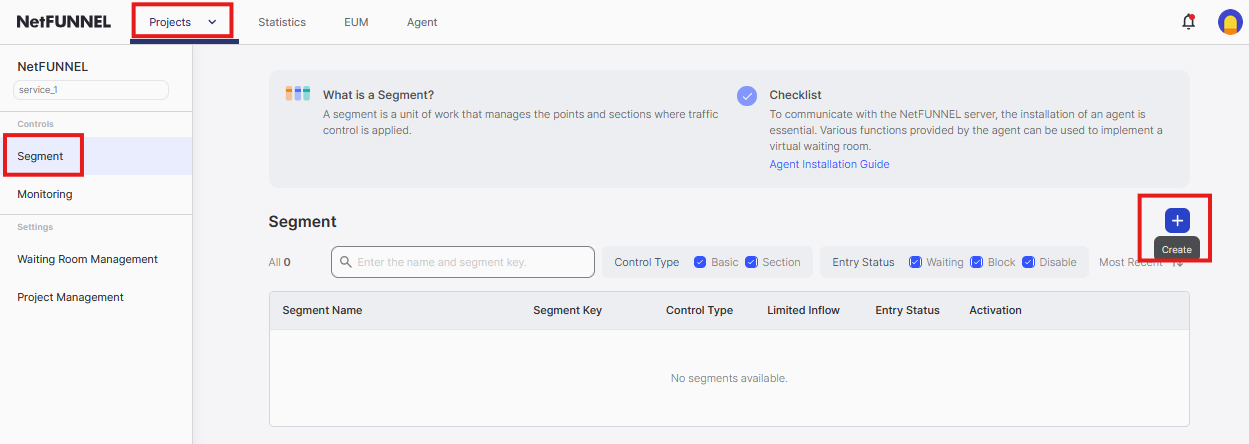
Step 3: Create a Segment
Code-based Integration supports both Basic Control and Section Control. This guide uses Basic Control.
3.1 Create New Segment
- Go to NetFUNNEL console →
Projects→Segment - Click the
+button to create a new segment
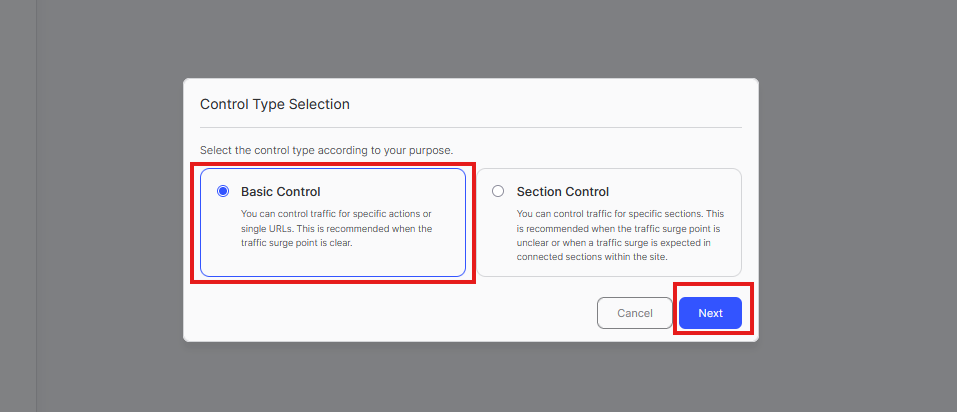
3.2 Select Control Type
Choose Basic Control and click Next
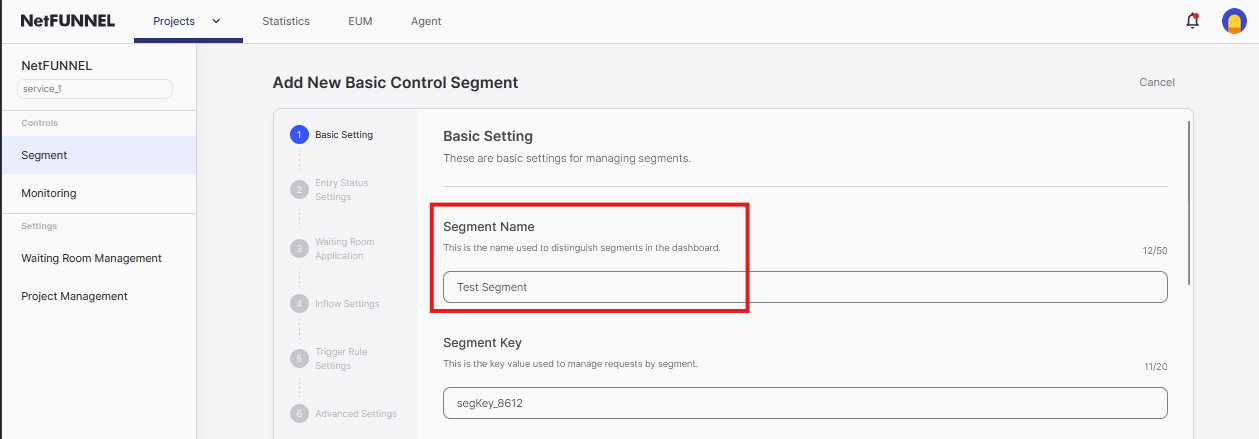
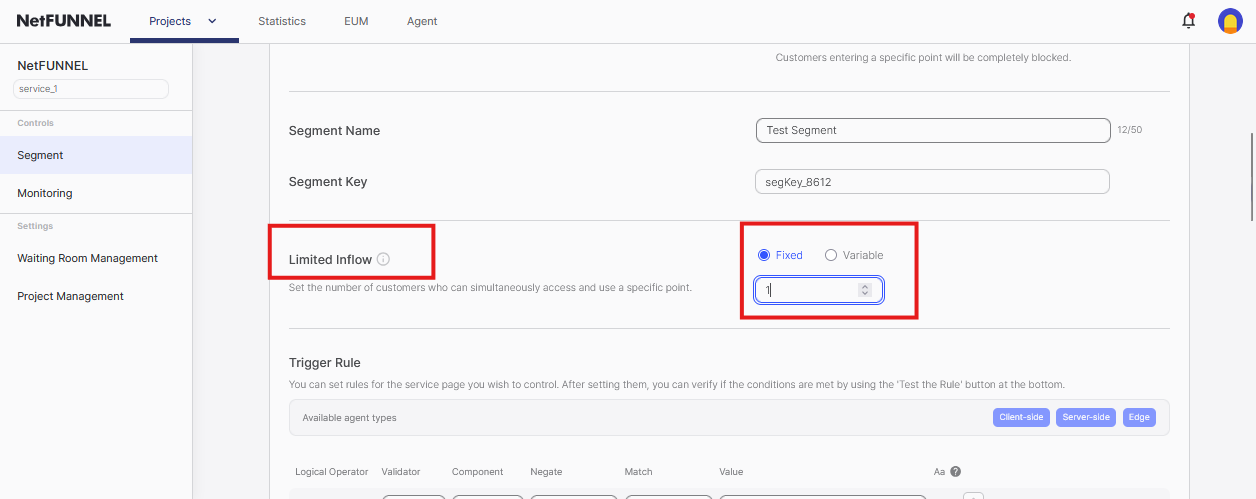
3.3 Configure Segment
Segment Name: Enter a descriptive name (e.g., "Login Button", "Checkout Process", "API Call Protection")
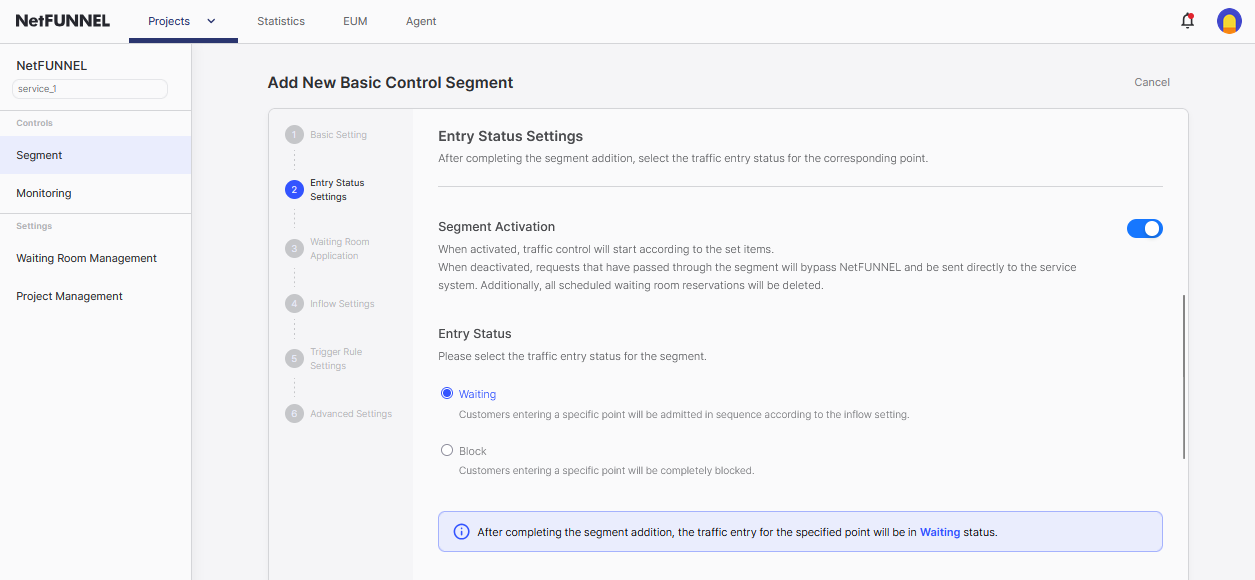
Entry Status:
- ✅ Segment Activation enabled
- Entry Status:
Waiting(sends users to waiting room)
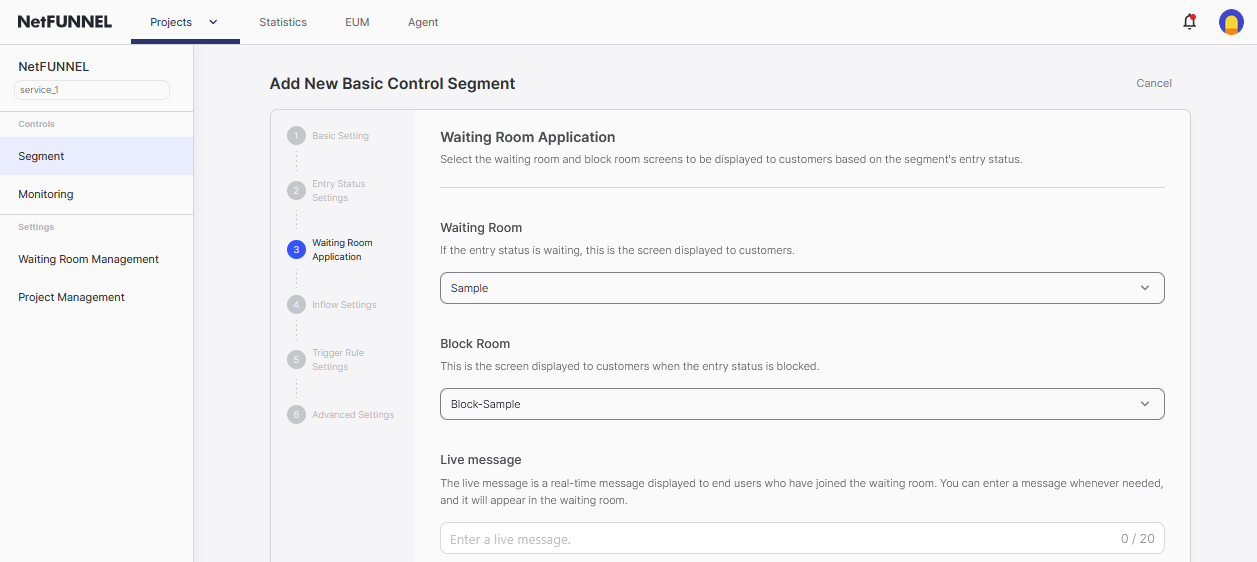
Waiting Room Application:
- Use default settings for testing
- Leave Live Message blank
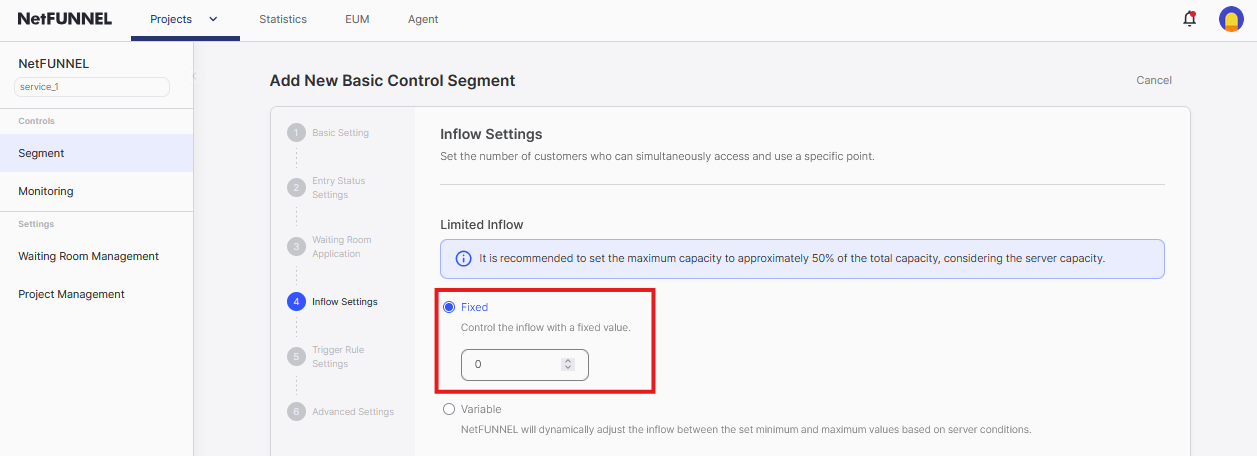
Limited Inflow:
- Set to
0for testing (no one admitted, waiting room always appears)
3.4 Create Segment
Click Create to finalize the segment
Step 4: Identify Key Issuance Integration Point (nfStart)
The following examples use a sample application for demonstration purposes. Your actual application code will naturally differ from what is shown here. Adapt the integration patterns to match your specific code structure, button IDs, function names, and business logic.
💡 Need a practice project? Check out our Sample Projects for a Web Application (Vanilla JavaScript MPA) template ready for NetFUNNEL integration practice.
Understanding Our Sample Application:
Let's examine our sample application to understand where NetFUNNEL protection should be applied:
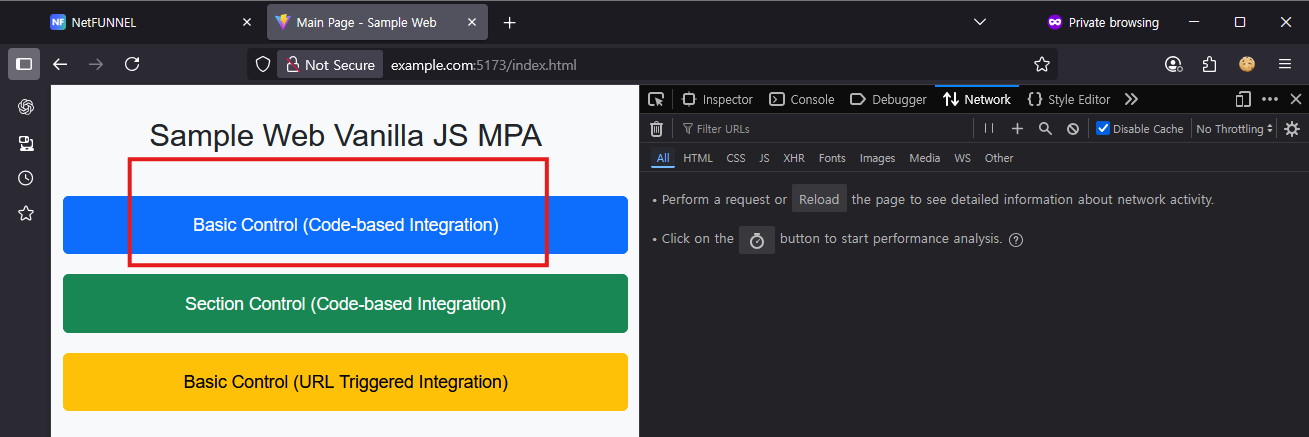
4.1 Identify the Target Button in HTML
<button id="btn-basic-control-function" class="btn btn-primary btn-main">
  Basic Control (Code-based Integration)
</button>
<button id="btn-sectional-control-function" class="btn btn-success btn-main">
  Section Control (Code-based Integration)
</button>
<button id="btn-basic-control-dynamic" class="btn btn-warning btn-main">
  Basic Control (URL Triggered Integration)
</button>
Our Assumptions for This Sample:
- The "Basic Control (Code-based Integration)" button (
btn-basic-control-function) represents a resource-intensive operation - This could be: user login, payment processing, file upload, or data export
- When many users click this button simultaneously, it could overwhelm the server
- The other buttons are less critical and don't need protection
4.2 Find the Event Listener for This Button
document.addEventListener('DOMContentLoaded', () => {
  console.log('Main page loaded');

  // Setup navigation buttons
  setupNavButton('btn-basic-control-function', './pages/basic-control-function/index.html');
  setupNavButton('btn-sectional-control-function', './pages/sectional-control-function/section1/index.html');
  setupNavButton('btn-basic-control-dynamic', './pages/basic-control-dynamic/index.html');
});
4.3 Examine What Happens Inside the Event Listener Function
export const setupNavButton = (buttonId, targetUrl) => {
  const button = document.getElementById(buttonId);
  if (button) {
    console.log(`Setting up button ${buttonId} to navigate to ${targetUrl}`);
    button.addEventListener('click', () => {
      navigateWithDelay(targetUrl);  // ← This is where server load happens
    });
  } else {
    console.error(`Button with ID ${buttonId} not found`);
  }
};
4.4 Identify the Integration Point
- Target Button:
btn-basic-control-function(the resource-intensive one) - Event Listener:
setupNavButton()function sets up the click handler - Integration Location: Right before
navigateWithDelay(targetUrl)is called - Why Here: This is the exact moment before server processing begins
- Protection Strategy: Add NetFUNNEL queue before the server call
Complete Flow Analysis:
- Page Load:
DOMContentLoadedevent fires - Button Setup:
setupNavButton()is called for each button - Event Binding: Each button gets a click event listener
- User Action: User clicks "Basic Control (Code-based Integration)"
- Current Behavior:
navigateWithDelay(targetUrl)executes immediately - Server Load: This triggers the resource-intensive operation
The Logic:
- Without NetFUNNEL: Button click → Immediate server request → Potential overload
- With NetFUNNEL: Button click → Queue check → Controlled server request → Success
Step 5: Implement Key Issuance Function (nfStart)
The example below shows how to integrate NetFUNNEL into the sample application's setupNavButton function. Adapt this pattern to your actual code structure - you may have different function names, event handlers, or business logic that needs protection.
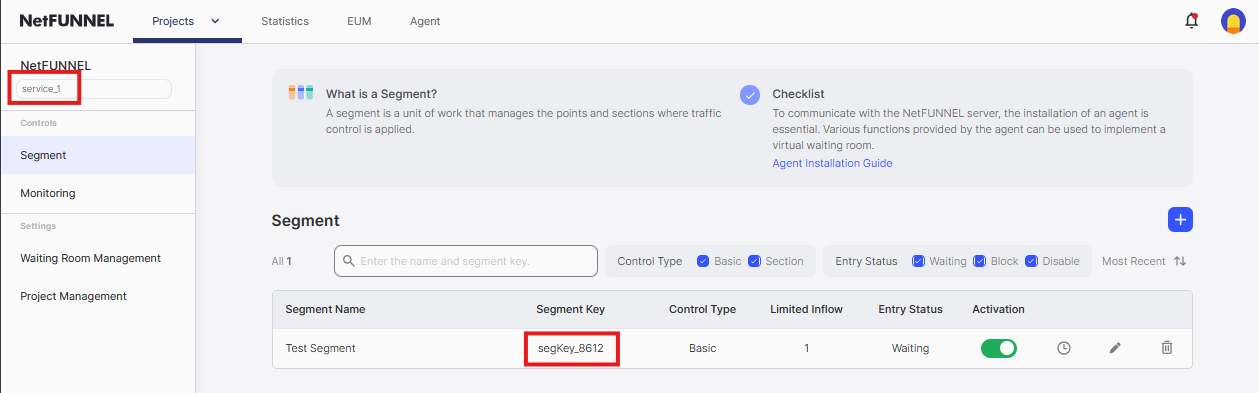
5.1 Get Your Keys
First, find your Project Key and Segment Key in the console:
- Go to NetFUNNEL console →
Projects→Segment - Click on your segment
- Copy the Project Key and Segment Key
5.2 Understand the nfStart Function
The nfStart function has this basic structure:
nfStart({
  projectKey: "your_project_key",    // From console
  segmentKey: "your_segment_key"     // From console
}, function(response) {
  // Handle the response
  if (response.status === 'Success') {
    // Proceed with your logic
  }
});
For complete details about nfStart parameters, callback handling, and response formats, see the API Reference.
5.3 Start with Your Current Code
Current Implementation:
export const setupNavButton = (buttonId, targetUrl) => {
  const button = document.getElementById(buttonId);
  if (button) {
    console.log(`Setting up button ${buttonId} to navigate to ${targetUrl}`);
    button.addEventListener('click', () => {
      navigateWithDelay(targetUrl);  // ← This is our business logic
    });
  } else {
    console.error(`Button with ID ${buttonId} not found`);
  }
};
The Core Concept:
- Business Logic:
navigateWithDelay(targetUrl)represents a resource-intensive operation - Integration Point: We need to wrap this business logic with NetFUNNEL protection
- Wrapping Strategy: Use
nfStart()to control access before the business logic executes
Why Wrap Here:
- This is the exact moment before server load begins
- Wrapping here protects the entire downstream operation
- The business logic remains unchanged - we just add a queue layer
5.4 Add Basic NetFUNNEL Protection (Success Only)
Wrap the Business Logic:
export const setupNavButton = (buttonId, targetUrl) => {
  const button = document.getElementById(buttonId);
  if (button) {
    console.log(`Setting up button ${buttonId} to navigate to ${targetUrl}`);
    button.addEventListener('click', () => {
      if (buttonId === 'btn-basic-control-function') {
        // This function handles all buttons, but only wrap this specific one
        nfStart({
          projectKey: 'service_1',
          segmentKey: 'segKey_8612'
        }, function (response) {
          if (response.status === 'Success') {
            navigateWithDelay(targetUrl);  // Original business logic
          }
        });
      } else {
        navigateWithDelay(targetUrl);  // No protection needed
      }
    });
  } else {
    console.error(`Button with ID ${buttonId} not found`);
  }
};
What Changed:
- Wrapped:
navigateWithDelay(targetUrl)is now inside thenfStartcallback - Conditional: Only the specific button gets NetFUNNEL protection
- Success-Only: Business logic runs only when NetFUNNEL allows entry
5.5 Add Function Availability Check
Add typeof check to prevent errors:
export const setupNavButton = (buttonId, targetUrl) => {
  const button = document.getElementById(buttonId);
  if (button) {
    console.log(`Setting up button ${buttonId} to navigate to ${targetUrl}`);
    button.addEventListener('click', () => {
      if (buttonId === 'btn-basic-control-function') {
        // This function handles all buttons, but only wrap this specific one
        if (typeof window.nfStart === 'function') {
          nfStart({
            projectKey: 'service_1',
            segmentKey: 'segKey_8612'
          }, function (response) {
            if (response.status === 'Success') {
              navigateWithDelay(targetUrl);
            }
          });
        } else {
          // Fallback if NetFUNNEL not loaded
          console.log(`Navigating to ${targetUrl} without NetFunnel`);
          navigateWithDelay(targetUrl);
        }
      } else {
        // Other buttons proceed without NetFUNNEL
        navigateWithDelay(targetUrl);
      }
    });
  } else {
    console.error(`Button with ID ${buttonId} not found`);
  }
};
Why this check is essential:
- Prevents crashes: Without this check, calling
nfStart()when NetFUNNEL isn't loaded causesReferenceError - Graceful degradation: If NetFUNNEL fails to load (network issues, CDN problems), your app continues working
- Development flexibility: Allows testing without NetFUNNEL script loaded
5.6 Modularize NetFUNNEL Integration
The code is getting messy with nested conditions. Let's modularize it:
// NetFUNNEL configuration
const NETFUNNEL_CONFIG = {
  projectKey: 'service_1',
  segmentKey: 'segKey_8612'
};

// Handle NetFUNNEL Success response only
function handleNetFunnelResponse(response, businessLogic) {
  switch (response.status) {
    case 'Success':
      console.log('NetFUNNEL: Entry granted');
      businessLogic(); // Execute the passed business logic
      break;
  }
}

// Wrap business logic with nfStart protection
function wrapWithNfStart(businessLogic) {
  if (typeof window.nfStart === 'function') {
    console.log(`Executing with NetFunnel`);
    nfStart(NETFUNNEL_CONFIG, (response) => {
      handleNetFunnelResponse(response, businessLogic);
    });
  } else {
    console.log(`Executing without NetFunnel`);
    businessLogic();
  }
}

// Clean, modular setupNavButton
export const setupNavButton = (buttonId, targetUrl) => {
  const button = document.getElementById(buttonId);
  if (button) {
    console.log(`Setting up button ${buttonId} to navigate to ${targetUrl}`);
    button.addEventListener('click', () => {
      if (buttonId === 'btn-basic-control-function') {
        // This function handles all buttons, but only wrap this specific one
        wrapWithNfStart(() => navigateWithDelay(targetUrl));
      } else {
        navigateWithDelay(targetUrl); // No protection needed
      }
    });
  } else {
    console.error(`Button with ID ${buttonId} not found`);
  }
};
Benefits of this modular approach:
- Separation of concerns: NetFUNNEL logic is separate from button setup
- Reusable:
wrapWithNfStart()can be used for other protected operations - Maintainable: Easy to modify NetFUNNEL behavior in one place
- Readable: The main function is clean and easy to understand
5.7 Add Complete Callback Handling
Now add comprehensive handling for all NetFUNNEL response states:
This step enhances the callback handling to cover all possible NetFUNNEL response states. Each response type requires different handling strategies to ensure optimal user experience and service reliability.
Why Complete Callback Handling is Essential:
- User Experience: Different response types need appropriate user feedback
- Service Reliability: Error states should not break the user's workflow
- Debugging: Comprehensive logging helps identify issues quickly
- Business Continuity: Service should continue even when NetFUNNEL encounters problems
// Handle NetFUNNEL response for any business logic
function handleNetFunnelResponse(response, businessLogic, retryCount = 0) {
  const MAX_RETRIES = 1; // Only retry once

  switch (response.status) {
    case 'Success':
      // Entry or bypass received - execute the original service logic
      // This is the normal flow: user passed the queue and can proceed
      console.log('NetFUNNEL: Entry granted');
      businessLogic(); // Execute the passed business logic
      break;

    case 'Error':
      // System error occurred - execute original logic for smooth UX
      // NetFUNNEL server error (500) - proceed anyway to maintain service availability
      console.log(`NetFUNNEL system error: ${response.message}`);
      businessLogic(); // Proceed anyway to maintain service availability
      break;

    case 'NetworkError':
      // Network error occurred - retry or proceed based on retry count
      // Temporary network issues (1001, 1002) - retry once, then proceed
      if (retryCount < MAX_RETRIES) {
        console.log(`NetFUNNEL network error: ${response.message}. Retrying... (${retryCount + 1}/${MAX_RETRIES})`);
        setTimeout(() => {
          wrapWithNfStart(businessLogic, retryCount + 1);
        }, 2000); // Wait 2 seconds before retry
      } else {
        console.log('NetFUNNEL: Max retries reached, proceeding without protection');
        businessLogic(); // Proceed anyway after max retries
      }
      break;

    case 'Block':
      // Entry state is blocked - notify user
      // Segment is in block state (301) - inform user, don't proceed
      console.log('NetFUNNEL: Entry blocked');
      alert("This page is currently blocked for entry.");
      break;

    case 'IpBlock':
      // Blocked due to repeated requests - notify user
      // IP blocked by BotManager or blacklist (302) - inform user, don't proceed
      console.log('NetFUNNEL: IP blocked');
      alert("You have been blocked due to repeated requests.");
      break;

    case 'Close':
      // User clicked close/cancel in waiting room
      // User manually canceled waiting (499) - inform user, don't proceed
      console.log('NetFUNNEL: Waiting canceled by user');
      alert("Waiting has been canceled.");
      break;
  }
}

// Updated wrapWithNfStart with complete callback handling
function wrapWithNfStart(businessLogic, retryCount = 0) {
  if (typeof window.nfStart === 'function') {
    console.log(`Executing with NetFunnel`);
    nfStart(NETFUNNEL_CONFIG, (response) => {
      handleNetFunnelResponse(response, businessLogic, retryCount);
    });
  } else {
    console.log(`Executing without NetFunnel`);
    businessLogic();
  }
}
Response Handling Strategy:
| Response Type | Status Code | Action | Business Logic | User Notification |
|---|---|---|---|---|
| Success | 200, 300, 303 | Execute | ✅ Yes | Optional |
| Error | 500 | Execute | ✅ Yes | Optional |
| NetworkError | 1001, 1002 | Retry → Execute | ✅ Yes (after retry) | Optional |
| Block | 301 | Stop | ❌ No | Optional |
| IpBlock | 302 | Stop | ❌ No | Optional |
| Close | 499 | Stop | ❌ No | Optional |
What Changed:
- Complete callback handling: Now handles all NetFUNNEL response states (
Success,Error,NetworkError,Block,IpBlock,Close) - Smart retry logic: NetworkError automatically retries once with 2-second delay, then proceeds
- User notifications: Optional alerts can be added to any response type based on your UX requirements
- Graceful degradation: Error states proceed with business logic to maintain service availability
- Comprehensive logging: Detailed console messages for all response types and debugging
For detailed information about all callback response types, status codes, response object structure, and advanced callback patterns, see the API Reference.
5.8 Key Implementation Points
typeofcheck: Always verify NetFUNNEL functions are loaded before calling them- Project/Segment keys: Use exact keys from the NetFUNNEL console
- Callback branching: Handle
Success,Error, andNetworkErrorstates appropriately - Fallback logic: Ensure service continues even if NetFUNNEL is unavailable
Step 6: Identify Key Return Integration Point (nfStop)
The following examples use a sample application for demonstration purposes. Your actual application code will naturally differ from what is shown here. Adapt the integration patterns to match your specific code structure, business logic completion points, and key return requirements.
💡 Need a practice project? Check out our Sample Projects for a Web Application (Vanilla JavaScript MPA) template ready for NetFUNNEL integration practice.
Understanding Our Sample Application:
Let's examine our sample application to understand where nfStop should be called to return the NetFUNNEL key.
6.1 Identify Business Logic Completion Points
Current Flow After nfStart Success:
// From Step 5 - when nfStart succeeds
case 'Success':
  console.log('NetFUNNEL: Entry granted');
  businessLogic(); // This executes navigateWithDelay(targetUrl)
  break;
What Happens Next:
- User enters the target page (e.g.,
./pages/basic-control-function/index.html) - Page loads completely - all resources, scripts, and content are ready
- User's session is active - they can now use the protected functionality
- Key should be returned - to allow the next user in queue to enter
Important Note about nfStop Implementation:
nfStop can be called independently without requiring nfStart to be called first. If nfStart was never called, NetFUNNEL will automatically handle the key release if needed, or do nothing if no key exists. This makes nfStop safe to call in any scenario without conditional checks, simplifying the implementation.
6.2 Identify Integration Points for Key Return
Integration Point Options:
| Integration Point | When to Use | Pros |
|---|---|---|
| Page Load | Simple navigation flows | Easy to implement, works for most cases |
| Business Logic Completion | Complex operations (API calls, processing) | Precise control, returns key after actual work |
6.3 Choose the Right Integration Point
For Our Sample Application:
Current Business Logic: navigateWithDelay(targetUrl)
- What it does: Simulates server processing and navigates to target page
- When it completes: When the target page loads successfully
- Best integration point: Page load event on target page
Integration Strategy:
- Target Page Load: Return key when the target page loads
- Simple and Reliable: Works for navigation-based flows
- User Experience: Key is returned when user can actually use the service
6.4 Verify Integration Point Logic
Complete Flow Analysis:
- User clicks button →
nfStart()called - Waiting room appears → User waits in queue
- Entry granted →
Successcallback fires - Business logic executes →
navigateWithDelay(targetUrl)runs - Target page loads → User can now use the service
- Key return needed → Call
nfStop()to free up queue slot
Why This Integration Point Makes Sense:
- User Experience: Key is returned when user can actually use the service
- Queue Management: Next user can enter as soon as current user is ready
- Resource Efficiency: Prevents unnecessary queue blocking
- Implementation Simplicity: Easy to implement and maintain
Key Insight: The nfStop integration point should be where the user's intended business operation is truly complete and they can benefit from the service they queued for.
Step 7: Implement Key Return Function (nfStop)
The examples below show different approaches for returning keys. Choose the approach that best fits your application's architecture - whether you need to return keys after page navigation, API calls, or other business logic completion.
7.1 Understand the nfStop Function
The nfStop function has this basic structure:
nfStop({
  projectKey: "your_project_key",    // Must match nfStart keys exactly
  segmentKey: "your_segment_key"     // Must match nfStart keys exactly
});
Key Requirements:
- Exact Key Matching: Keys must be identical to those used in
nfStart() - Timing: Call after business logic completes, not immediately after
nfStart()
7.2 Add Basic Key Return (Page Load)
Wrap the page load event:
// Add this to the target page (e.g., ./pages/basic-control-function/index.html)
window.addEventListener('load', function () {
  nfStop({
    projectKey: 'service_1',
    segmentKey: 'segKey_8612'
  });
});
What Changed:
- Page Load: Returns key when the target page loads
- Simple Approach: Works for basic navigation scenarios
- Direct Call: Assumes NetFUNNEL is loaded and available
7.3 Add Function Availability Check
Add typeof check to prevent errors:
// Add this to the target page (e.g., ./pages/basic-control-function/index.html)
window.addEventListener('load', function () {
  if (typeof window.nfStop === 'function') {
    nfStop({
      projectKey: 'service_1',
      segmentKey: 'segKey_8612'
    });
  } else {
    // Fallback if NetFUNNEL not loaded
    console.log('NetFUNNEL not available, skipping key return');
  }
});
Why this check is essential:
- Prevents crashes: Without this check, calling
nfStop()when NetFUNNEL isn't loaded causesReferenceError - Graceful degradation: If NetFUNNEL fails to load (network issues, CDN problems), your app continues working
- Development flexibility: Allows testing without NetFUNNEL script loaded
7.4 Key Return Best Practices
Return NetFUNNEL keys when your business logic completes. While NetFUNNEL automatically returns keys after timeout, manual returns provide better user experience and queue efficiency.
The Rule:
- ✅ Always: Return key after business logic completes (success or failure)
- ⚠️ Auto-timeout: NetFUNNEL returns keys automatically if not returned manually
Example: Login Process
function performLogin(loginData) {
  fetch('/api/login', {
    method: 'POST',
    body: JSON.stringify(loginData)
  })
  .then(response => response.json())
  .then(data => {
    // Login successful
    console.log('Login completed');
    // Return key after successful login
    if (typeof window.nfStop === 'function') {
      nfStop({
        projectKey: 'service_1',
        segmentKey: 'segKey_8612'
      });
    }
  })
  .catch(error => {
    // Login failed - but still return the key
    console.error('Login failed:', error);
    if (typeof window.nfStop === 'function') {
      nfStop({
        projectKey: 'service_1',
        segmentKey: 'segKey_8612'
      });
    }
  });
}
Key Requirements:
- Exact Match: Keys in
nfStop()must matchnfStart()exactly - Timing: Call after business logic completes, not immediately
- Always: Return keys on success, failure, and error
For detailed information about nfStop parameters, response handling, and advanced key return patterns, see the API Reference.
Step 8: Test Waiting Room (Limited Inflow = 0)
The testing steps below are based on the sample application. Adapt the testing process to your actual application - replace button names, URLs, and verification steps with your specific implementation.
8.1 Trigger the Action
-
Clear network logs (if you want to observe from a clean state)
- Click the trash icon in DevTools Network tab to clear previous logs
-
Click the protected button (e.g., "Basic Control (Code-based Integration)")
Expected result: Modal waiting room appears on current screen
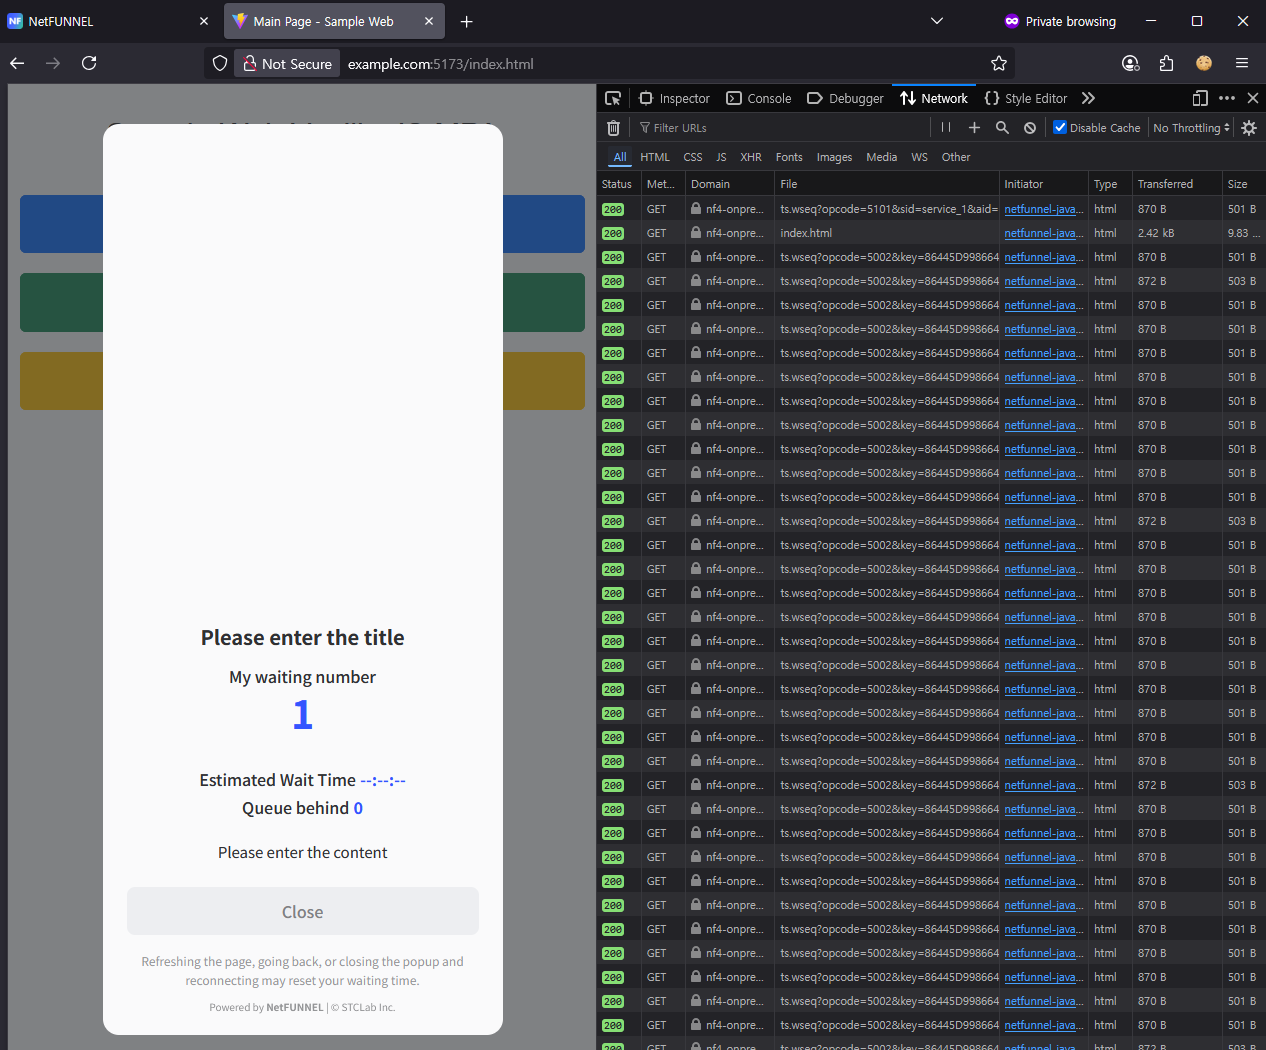
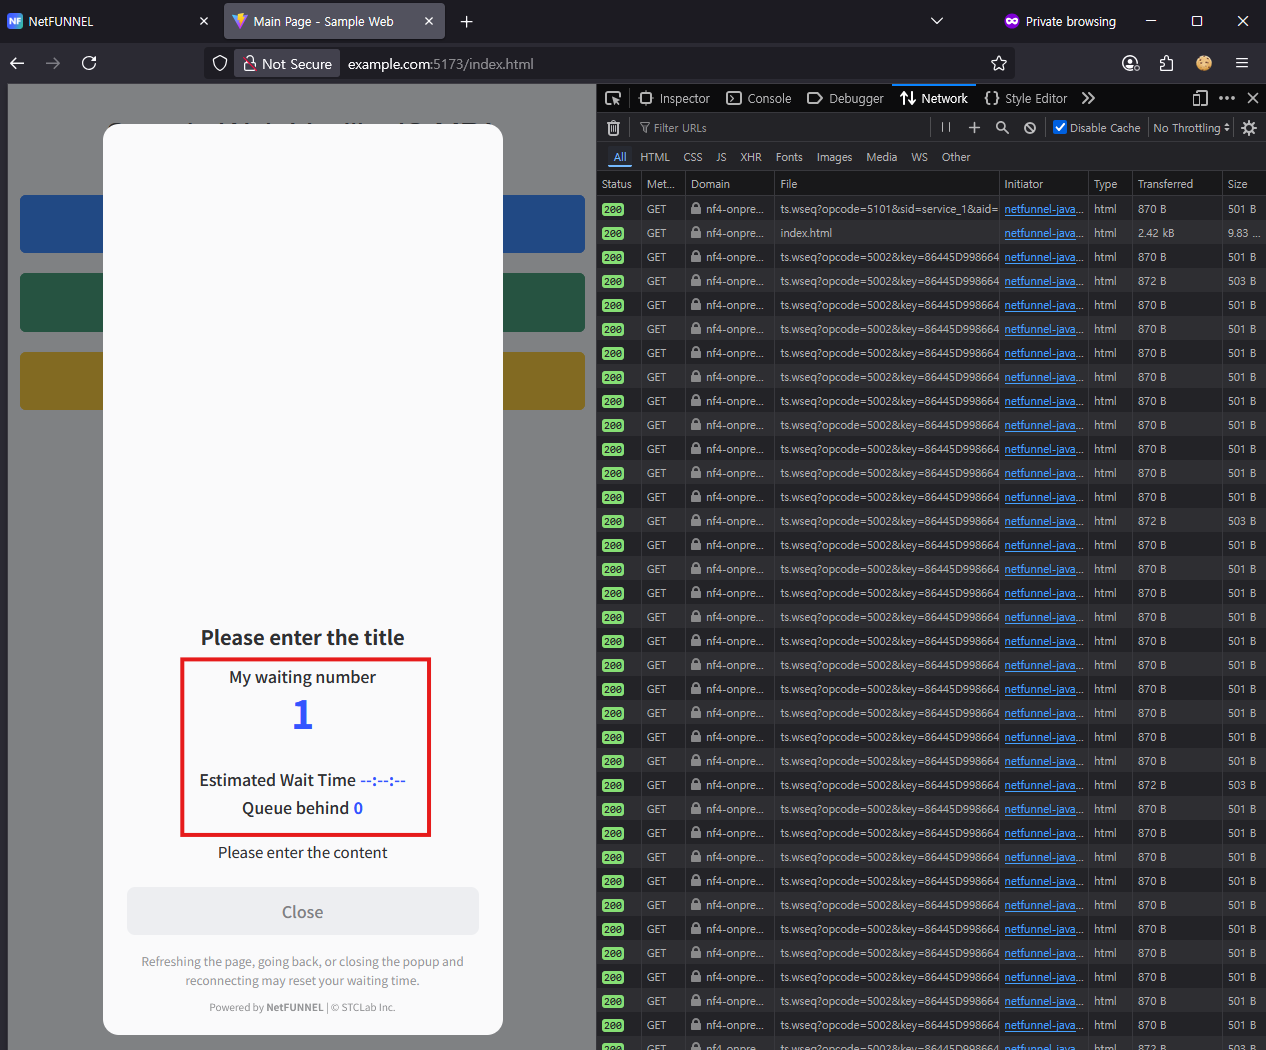
8.2 Verify Waiting Room Display
Check these elements are shown correctly:
With Limited Inflow set to 0 and only one user connected, verify:
- My waiting number: 1
- Estimated Wait Time: N/A
- Queue behind: 0
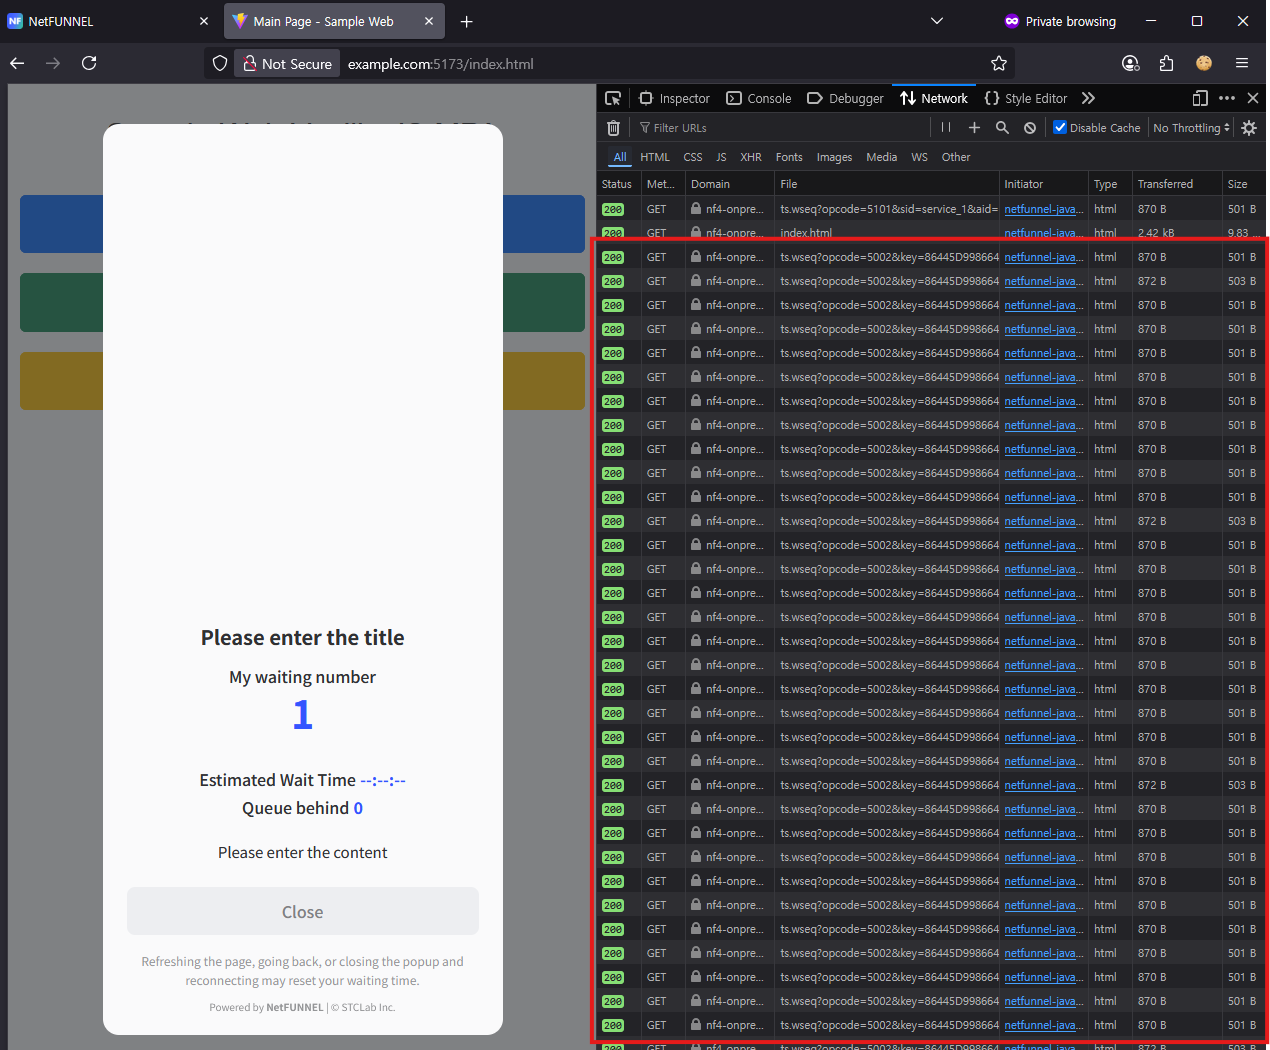
8.3 Check Network Activity
Verify periodic requests:
- Look for
ts.wseq?opcode=5002requests repeating periodically opcode=5002= Re-Entry Request (asking if entry is allowed)
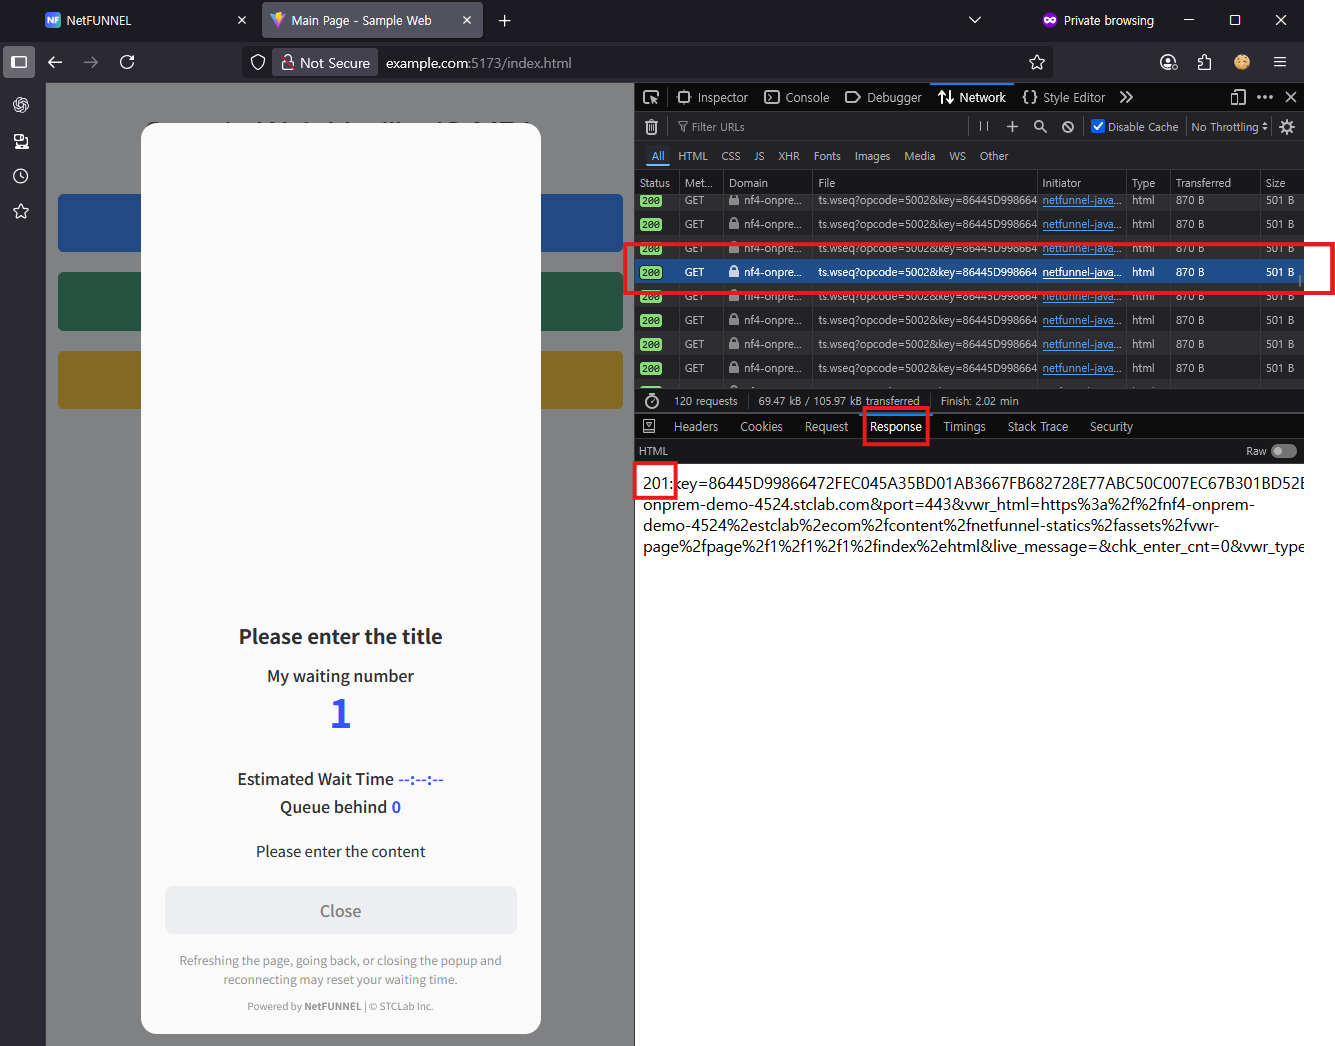
Verify response:
- Click one of the
ts.wseq?opcode=5002requests - Check Response Body shows
201(WAIT) 201= WAIT,200= PASS (entry allowed)- Here, since Limited Inflow is 0, the correct response is
201
8.4 Verify Agent Files Loading
Confirm both required files load successfully:
netfunnel-javascript-agent.jswith HTTP Status 200nf-setting.jsonwith HTTP Status 200
Step 9: Test Entry (Limited Inflow = 1)
9.1 Update Segment Settings
- Return to NetFUNNEL console
- Click segment's
Editbutton to open the edit screen
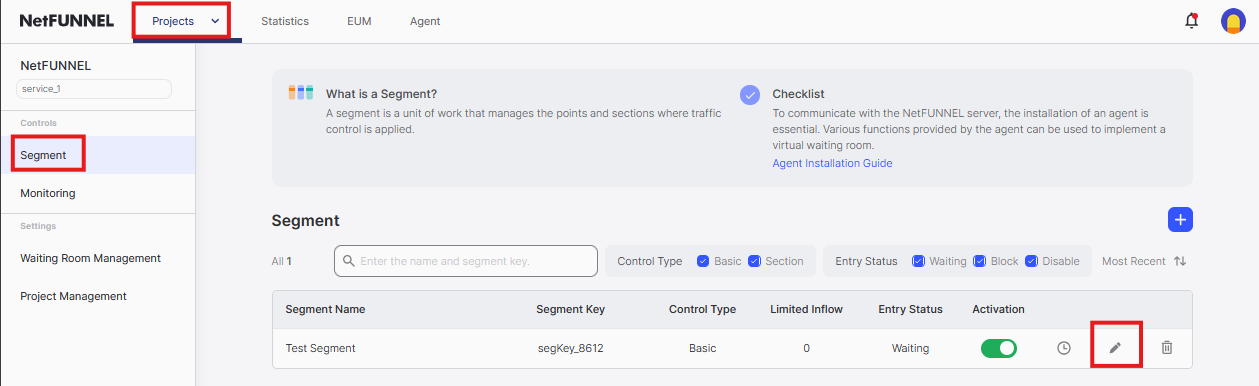
- Change Limited Inflow from
0to1 - Click
Confirmat the bottom
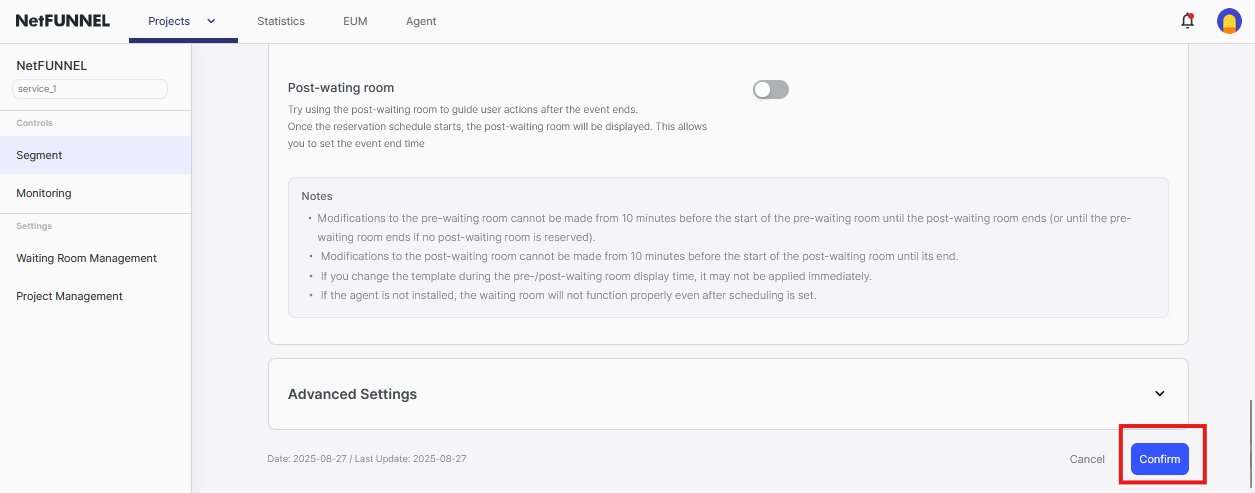
As soon as you click Confirm, the waiting room will disappear and you will immediately enter the target page. If you want to observe this moment, keep another screen open where the waiting room is currently displayed.
9.2 Verify Entry
Expected result: Waiting room disappears immediately, original logic executes
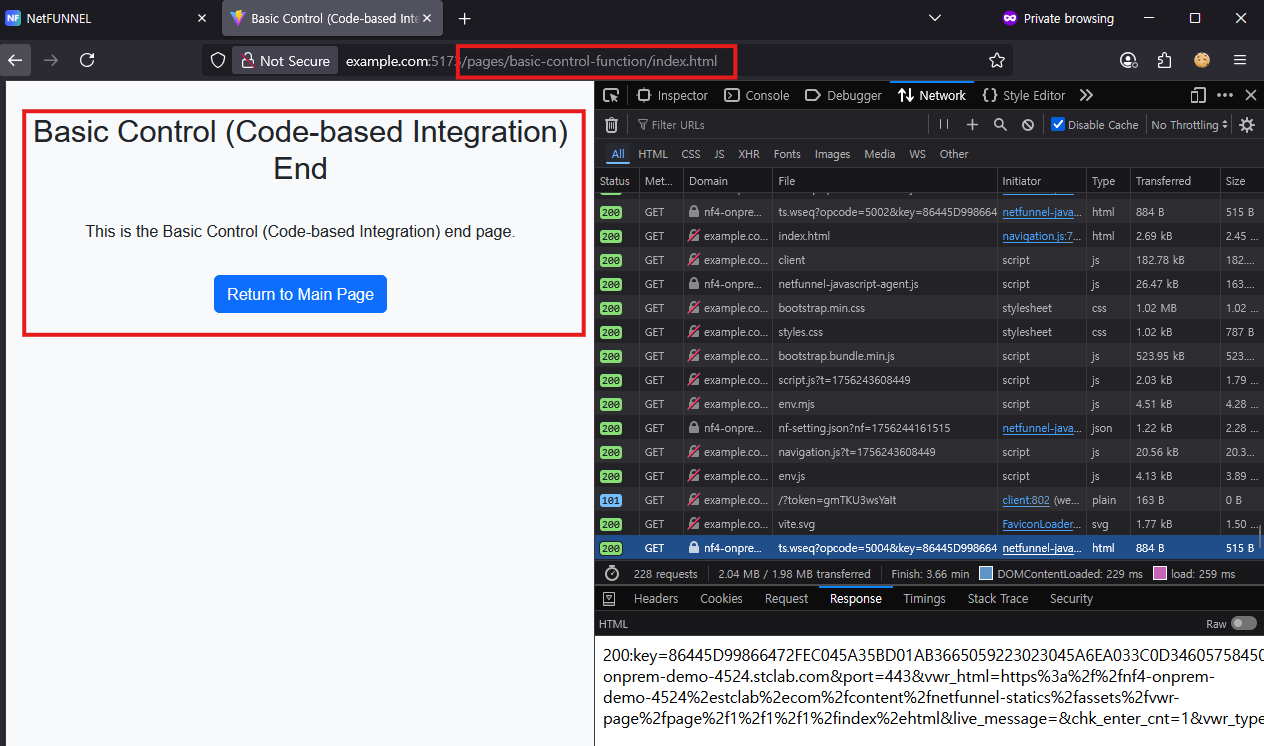
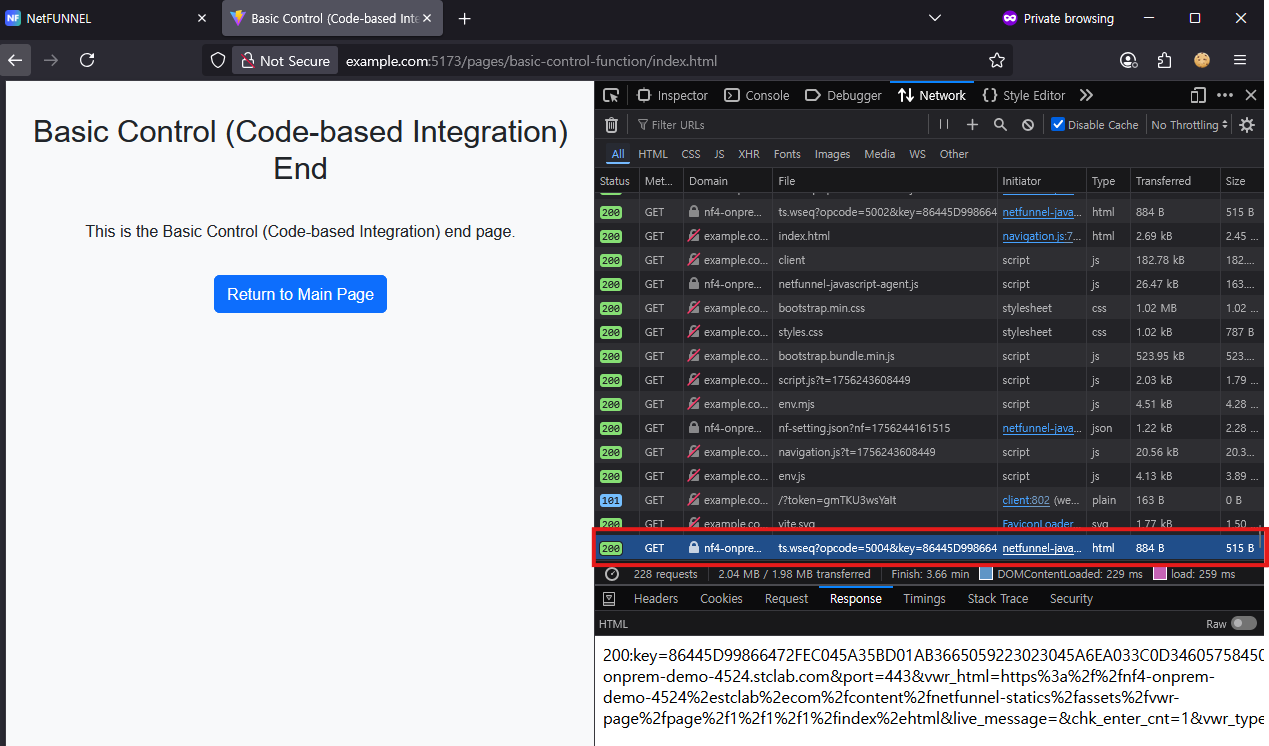
9.3 Check Key Return
Verify successful key return:
ts.wseq?opcode=5004request with HTTP 200opcode=5004= Key Return request- This is necessary so the next user in line can finish waiting and enter the service
Summary
Essential Points (Must Do)
Setup:
- Install NetFUNNEL agent and verify files load with HTTP 200
- Create segment in console with Basic Control
- Get Project Key and Segment Key from console
- Set Limited Inflow to 0 for testing, 1+ for production
Integration:
- Add
typeofcheck before calling NetFUNNEL functions - Wrap business logic with
nfStart()in click handlers - Handle
Successresponse to execute business logic - Call
nfStop()after business logic completes - Use identical keys in both
nfStart()andnfStop()
Error Handling:
- Handle
Errorby proceeding with business logic - Handle
NetworkErrorby retrying once, then proceeding with business logic - Handle
BlockandIpBlockby showing user alerts - Handle
Closeby doing nothing (user canceled) - Provide fallback logic when NetFUNNEL is unavailable
Testing:
- Test waiting room appears with Limited Inflow = 0
- Test entry works with Limited Inflow = 1
- Verify key return occurs after completion
Optional Items (Nice to Have)
Error Handling Enhancements:
- Add retry logic for
NetworkErrorresponses - Implement exponential backoff for retries
- Add user-friendly error messages instead of alerts
Code Organization:
- Create centralized configuration object
- Build reusable wrapper functions
- Implement modular integration patterns
Best Practices
Function Availability Check
if (typeof window.nfStart === 'function') {
  // NetFUNNEL available
  nfStart(config, callback);
} else {
  // Fallback logic
  console.log('NetFUNNEL not available, proceeding without protection');
  executeBusinessLogic();
}
Why this matters:
- Prevents crashes when NetFUNNEL script fails to load
- Allows your app to work even if NetFUNNEL is unavailable
- Essential for development and testing
Centralized Configuration
// Store your keys in one place
const NETFUNNEL_CONFIG = {
  projectKey: 'service_1',
  segmentKey: 'segKey_8612'
};

// Use the same config everywhere
nfStart(NETFUNNEL_CONFIG, callback);
nfStop(NETFUNNEL_CONFIG);
Benefits:
- Easy to update keys across your entire app
- Reduces copy-paste errors
- Single source of truth for configuration
Complete Error Handling
function handleNetFunnelResponse(response, businessLogic, retryCount = 0) {
  const MAX_RETRIES = 1;

  switch (response.status) {
    case 'Success':
      businessLogic(); // Proceed with your logic
      break;
    case 'Error':
      // System error - proceed anyway to keep service running
      console.error('NetFUNNEL system error:', response.message);
      businessLogic();
      break;
    case 'NetworkError':
      // Network issue - retry once, then proceed
      if (retryCount < MAX_RETRIES) {
        console.log(`NetFUNNEL network error: ${response.message}. Retrying... (${retryCount + 1}/${MAX_RETRIES})`);
        setTimeout(() => {
          nfStart(NETFUNNEL_CONFIG, (response) => {
            handleNetFunnelResponse(response, businessLogic, retryCount + 1);
          });
        }, 2000); // Wait 2 seconds before retry
      } else {
        console.log('NetFUNNEL: Max retries reached, proceeding without protection');
        businessLogic(); // Proceed anyway after max retries
      }
      break;
    case 'Block':
      alert("Service is temporarily unavailable. Please try again later.");
      break;
    case 'IpBlock':
      alert("Access denied. Please contact support if this persists.");
      break;
    case 'Close':
      // User canceled - no action needed
      break;
  }
}
Key principle: Always proceed with business logic on system errors to maintain service availability.
Always Return Keys
// Return key after successful operation
fetch('/api/process-payment')
  .then(response => response.json())
  .then(data => {
    console.log('Payment processed');
    // Return key after successful payment
    if (typeof window.nfStop === 'function') {
      nfStop(NETFUNNEL_CONFIG);
    }
  })
  .catch(error => {
    console.error('Payment failed:', error);
    // Return key even on error
    if (typeof window.nfStop === 'function') {
      nfStop(NETFUNNEL_CONFIG);
    }
  });
When to return keys:
- After successful API calls
- After page navigation completes
- After form submissions finish
- Even when operations fail
Key Matching
// Start and stop must use identical keys
const keys = { projectKey: 'service_1', segmentKey: 'segKey_8612' };
nfStart(keys, callback);
nfStop(keys); // Must match exactly
Common Issues & Troubleshooting
Waiting Room Never Appears
Symptoms: Button click works normally, no waiting room shows up
Debug Steps:
- Check browser console for JavaScript errors
- Verify NetFUNNEL agent files load with HTTP 200:
netfunnel-javascript-agent.jsnf-setting.json
- Confirm segment is activated (not deactivated)
- Check Limited Inflow is set to 0 for testing
Callback Never Fires
Symptoms: nfStart called but no response received
Debug Steps:
- Check network tab for failed requests to NetFUNNEL servers
- Verify project/segment keys match console exactly (case-sensitive)
- Check if segment is activated (not deactivated)
- Try with Limited Inflow = 0 to force waiting room
Users Stuck in Queue
Symptoms: First user enters, but second user never gets through
Debug Steps:
- Check if
nfStop()is being called after business logic completes - Verify keys in
nfStop()matchnfStart()exactly - Look for JavaScript errors preventing
nfStop()execution - Check network tab for
ts.wseq?opcode=5004(key return) requests
Waiting Room Shows But Never Allows Entry
Symptoms: Waiting room appears but user never gets through, even with Limited Inflow = 1
Debug Steps:
- Check segment status in console - ensure it's not in "Block" mode
- Verify Limited Inflow is set to 1 or higher
- Check for
ts.wseq?opcode=5002requests in network tab - Look for error responses in the request details
QA Checklist
Pre-Implementation Verification
- Project Key / Segment Key match console exactly (reconfirm in console)
- Agent files (
netfunnel-javascript-agent.jsandnf-setting.json) load with HTTP 200 -
typeofcheck implemented to prevent calling functions before agent loads
Waiting Room Testing (Limited Inflow = 0)
- With Limited Inflow = 0, waiting room modal displays correctly
- Waiting room shows correct details:
- My waiting number: 1
- Estimated Wait Time: N/A
- Queue behind: 0
- While waiting,
ts.wseq?opcode=5002requests repeat periodically -
ts.wseq?opcode=5002response body shows201(WAIT)
Entry Testing (Limited Inflow = 1)
- When changing to Limited Inflow = 1,
Successcallback fires -
Successcallback executes original business logic - Waiting room disappears immediately upon entry
Key Return Verification
- At completion point, key return works correctly
-
ts.wseq?opcode=5004request occurs with HTTP 200 - Key return happens exactly once per
nfStartcall - Key return occurs after business logic completion
Error Handling
- Callback branching implemented for all required states:
-
Success- executes original logic -
Error- handles system errors appropriately -
NetworkError- handles network issues appropriately
-
- Fallback logic works when NetFUNNEL functions are unavailable
- Key matching -
projectKey/segmentKeyidentical innfStartandnfStop