Installation & Initialization
This guide covers the essential setup steps for integrating the NetFUNNEL Android Agent into your application.
Prerequisites
System Requirements
| Component | Version | Notes |
|---|---|---|
| Android API Level | 22+ (Lollipop 5.1) | Covers 99% of active Android devices |
| Java | 1.8+ | Required for Gradle build system |
| Kotlin | 1.9.0+ | For Kotlin-based Android development |
External Dependencies
| Library | Version | Purpose |
|---|---|---|
| Ktor | 2.1.0+ (< 3.0.0) | HTTP networking for API communication |
| Kotlinx Serialization | Any version | JSON data conversion |
- Ktor 3.0.0+: Not supported
- Android API Level 21 and below: Not supported
- Java 7 and below: Not supported
Dependencies are automatically configured during installation. No manual setup required.
Step 1: Download SDK
1.1 Download from NetFUNNEL Console
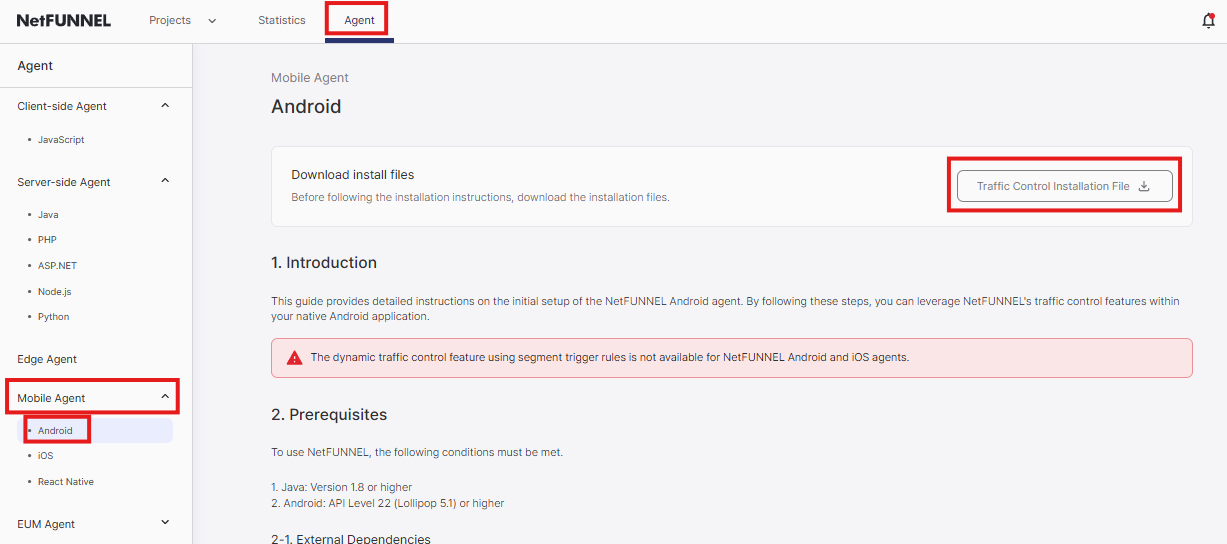
- Log in to your NetFUNNEL console
- Navigate to Agent → Mobile Agent → Android
- Click "Traffic Control Installation File" button
- Download the ZIP file:
netfunnel-android-agent-{{version}}.zip
1.2 Extract Files
- Extract the ZIP file to get:
netfunnel-android-agent-debug-{{version}}.aar(development)netfunnel-android-agent-release-{{version}}.aar(production)
- Development: Use debug AAR
- Production: Use release AAR
Step 2: Add Dependencies
2.1 Place AAR Files
- Create
app/libs/directory (if it doesn't exist) - Copy both AAR files to
app/libs/:netfunnel-android-agent-debug-{{version}}.aarnetfunnel-android-agent-release-{{version}}.aar
Project structure:
your-project/
├── app/
│   ├── libs/
│   │   ├── netfunnel-android-agent-debug-{{version}}.aar
│   │   └── netfunnel-android-agent-release-{{version}}.aar
│   └── build.gradle
└── build.gradle
2.2 Configure build.gradle
Edit app/build.gradle (not the project-level one):
- Add dependencies to the
dependencies { }block - Replace
{{version}}with your actual version number - Choose debug or release AAR based on your build type
- Kotlin DSL (build.gradle.kts)
- Groovy DSL (build.gradle)
dependencies {
    // NetFUNNEL Android Agent
    implementation(files("libs/netfunnel-android-agent-debug-{{version}}.aar"))

    // External dependencies
    val ktorVersion = "2.3.12"
    val serializationVersion = "1.6.3"

    implementation("io.ktor:ktor-client-core:$ktorVersion")
    implementation("io.ktor:ktor-client-okhttp:$ktorVersion")
    implementation("io.ktor:ktor-client-content-negotiation:$ktorVersion")
    implementation("io.ktor:ktor-serialization-gson:$ktorVersion")
    implementation("org.jetbrains.kotlinx:kotlinx-serialization-json:$serializationVersion")
}
ext {
    ktorVersion = "2.3.12"
    serializationVersion = "1.6.3"
}

dependencies {
    // NetFUNNEL Android Agent
    implementation files("libs/netfunnel-android-agent-debug-{{version}}.aar")

    // External dependencies
    implementation "io.ktor:ktor-client-core:$ktorVersion"
    implementation "io.ktor:ktor-client-okhttp:$ktorVersion"
    implementation "io.ktor:ktor-client-content-negotiation:$ktorVersion"
    implementation "io.ktor:ktor-serialization-gson:$ktorVersion"
    implementation "org.jetbrains.kotlinx:kotlinx-serialization-json:$serializationVersion"
}
2.3 Configure Android Settings
Update the android { } block in app/build.gradle (not the project-level one):
- minSdk: 22+ (matches prerequisites)
- compileOptions: Java 1.8+ compatibility
- kotlinOptions: jvmTarget 1.8+
- buildFeatures: Enable viewBinding
- Kotlin DSL (build.gradle.kts)
- Groovy DSL (build.gradle)
android {
    compileSdk = 34
    defaultConfig {
        minSdk = 22
        targetSdk = 34
    }
    compileOptions {
        sourceCompatibility = JavaVersion.VERSION_1_8
        targetCompatibility = JavaVersion.VERSION_1_8
    }
    kotlinOptions {
        jvmTarget = "1.8"
    }
    buildFeatures {
        viewBinding = true
    }
}
android {
    compileSdk 34
    defaultConfig {
        minSdk 22
        targetSdk 34
    }
    compileOptions {
        sourceCompatibility JavaVersion.VERSION_1_8
        targetCompatibility JavaVersion.VERSION_1_8
    }
    kotlinOptions {
        jvmTarget = '1.8'
    }
    buildFeatures {
        viewBinding true
    }
}
2.4 Add Internet Permission
Add internet permission to app/src/main/AndroidManifest.xml:
<manifest xmlns:android="http://schemas.android.com/apk/res/android">
    <uses-permission android:name="android.permission.INTERNET" />

    <application>
        <!-- Your activities -->
    </application>
</manifest>
2.5 Configure ProGuard/R8 (Release Builds)
When building release versions, code shrinking, obfuscation, and optimization can cause errors with NetFUNNEL Android Agent. To prevent this, exclude NetFUNNEL from obfuscation.
Add ProGuard rules to proguard-rules.pro:
# NetFUNNEL Android Agent - Protect main packages and classes
-keep class com.nf4.** { *; }

# NetFUNNEL Android Agent - Keep reflection-related classes and members
-keepclassmembers class com.nf4.** { *; }
Location: app/proguard-rules.pro
This configuration is mandatory for release builds. Without these rules, NetFUNNEL functionality will break due to obfuscation.
2.6 Verify Setup
- Sync project: File → Sync Project with Gradle Files
- Build project: Build → Assemble Project
Step 3: Initialize Agent
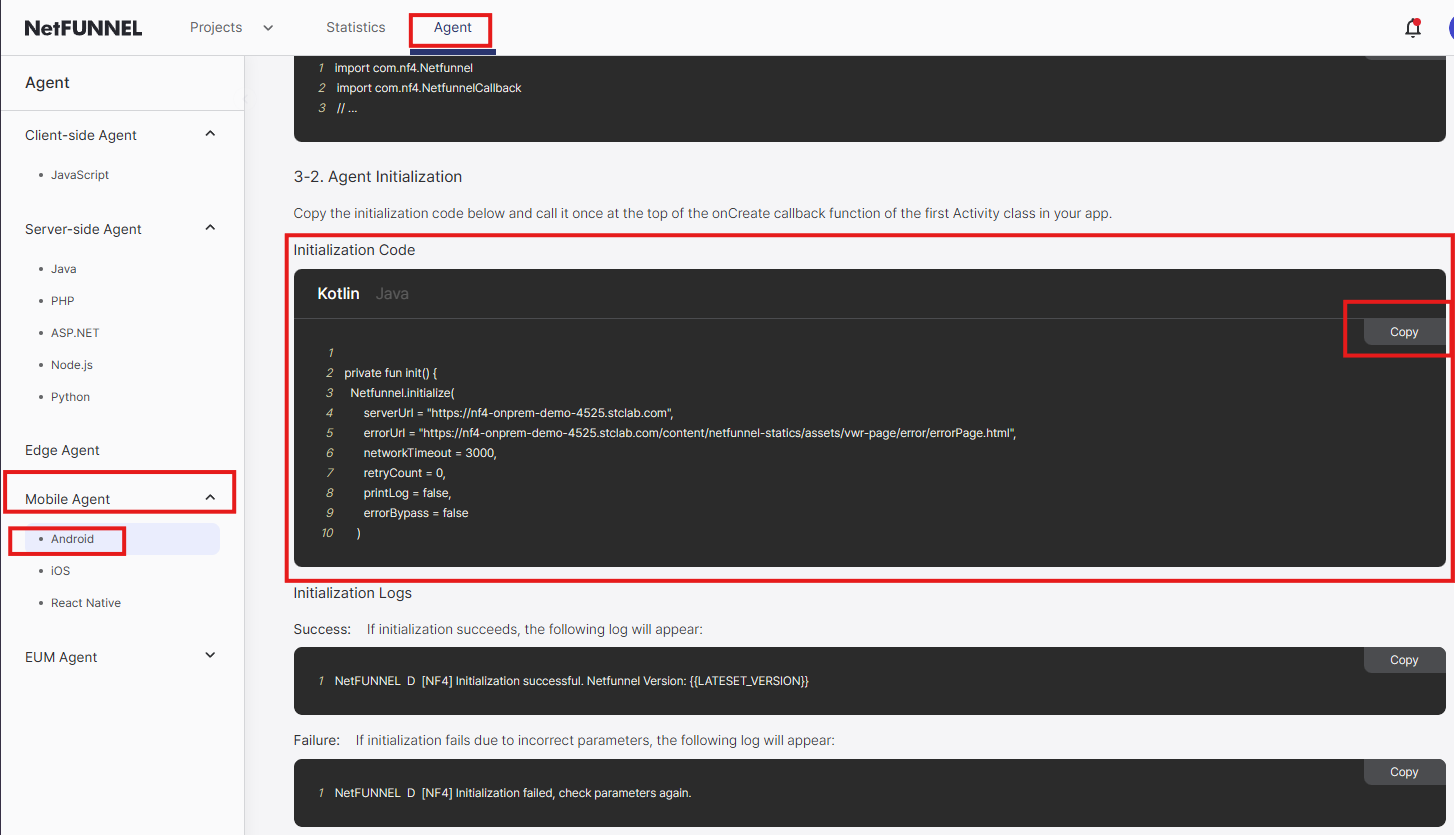
3.1 Get Initialization Code from NetFUNNEL Console
- Log in to your NetFUNNEL console
- Navigate to Agent → Mobile Agent → Android
- Copy the initialization code with your actual client ID
3.2 Initialize in Application Class
Initialize in Application.onCreate() before super.onCreate(). Missing this step = bypass mode (no protection).
Add initialization code to your Application class:
- Location:
app/src/main/java/your-package-name/YourAppApplication.kt(Kotlin) orYourAppApplication.java(Java)
If you don't have an Application class, create one:
-
Create Application class:
- Right-click on
app/src/main/java/your-package-name/in Android Studio - Select New → Kotlin Class/File or Java Class
- Name it
YourAppNameApplication(replace with your actual app name) - Make it extend
Applicationclass
- Right-click on
-
Register in AndroidManifest.xml:
- Open
app/src/main/AndroidManifest.xml - Add
android:name=".YourAppNameApplication"to the<application>tag
- Open
<manifest xmlns:android="http://schemas.android.com/apk/res/android">
    <application
        android:name=".YourAppNameApplication"
        android:allowBackup="true">
        <!-- Your activities -->
    </application>
</manifest>
Replace the example client ID with your actual client ID from the console.
- Kotlin
- Java
import com.nf4.Netfunnel

class YourAppNameApplication : Application() {
    override fun onCreate() {
        Netfunnel.initialize(
            clientId = "{{CLIENT_ID}}"
        )

        super.onCreate()
    }
}
import com.nf4.Netfunnel;

public class YourAppNameApplication extends Application {
    @Override
    public void onCreate() {
        Netfunnel.INSTANCE.initialize(
            "{{CLIENT_ID}}"
        );

        super.onCreate();
    }
}
Advanced: Exception Handling
For production apps, add try-catch error handling and set printLog: false:
- Kotlin
- Java
import com.nf4.Netfunnel
import android.util.Log

class YourAppNameApplication : Application() {
    override fun onCreate() {
        try {
            Netfunnel.initialize(
                clientId = "{{CLIENT_ID}}"
            )
        } catch (e: Exception) {
            Log.e("NetFUNNEL", "Initialization failed", e)
            // Handle error: show error screen or exit app
        }

        super.onCreate()
    }
}
import com.nf4.Netfunnel;
import android.util.Log;

public class YourAppNameApplication extends Application {
    @Override
    public void onCreate() {
        try {
            Netfunnel.INSTANCE.initialize(
                "{{CLIENT_ID}}"
            );
        } catch (Exception e) {
            Log.e("NetFUNNEL", "Initialization failed", e);
            // Handle error: show error screen or exit app
        }

        super.onCreate();
    }
}
Required Parameters
| Parameter | Type | Required | Description |
|---|---|---|---|
clientId | String | Yes | NetFUNNEL client ID |
Missing clientId = bypass mode (no waiting room protection)
For additional initialization parameters like networkTimeout, retryCount, printLog, and more, see the Configuration Options Reference.
Step 4: Build and Verify Installation
Now that you've completed the SDK setup and initialization, let's build your project and verify that NetFUNNEL is working correctly.
4.1 Build Your Project
Sync and Build
-
Sync Project with Gradle Files
- Go to
File→Sync Project with Gradle Files - Or click the
Sync Nownotification if it appears - Wait for sync to complete successfully
- Go to
-
Clean and Rebuild
- Go to
Build→Clean Project - After cleaning completes, go to
Build→Assemble Project - Monitor the
Buildtab for any errors
- Go to
Verify Build Success
-
Check Build Output
- Ensure no compilation errors in the
Buildtab - Look for successful dependency resolution messages
- Verify NetFUNNEL AAR files are properly included
- Ensure no compilation errors in the
-
Verify Dependencies
- In the
Projecttab, expandExternal Libraries - Confirm you see NetFUNNEL-related libraries listed
- Check that Ktor and Kotlinx Serialization dependencies are present
- In the
4.2 Test NetFUNNEL Initialization
Enable Debug Logging
To verify NetFUNNEL is initializing correctly, temporarily enable debug logging in your Application class:
Remember to set printLog = false in production builds for better performance and security.
- Kotlin
- Java
class YourAppNameApplication : Application() {
    override fun onCreate() {
        Netfunnel.initialize(
            clientId = "{{CLIENT_ID}}",
            printLog = true  // Enable debug logging
        )

        super.onCreate()
    }
}
public class YourAppNameApplication extends Application {
    @Override
    public void onCreate() {
        Netfunnel.INSTANCE.initialize(
            "{{CLIENT_ID}}"
        );

        super.onCreate();
    }
}
Monitor Logcat Output
-
Open Logcat
- Go to
View→Tool Windows→Logcat - Or click the
Logcattab in the bottom panel
- Go to
-
Filter NetFUNNEL Logs
- In the Logcat filter field, enter
package:mine NetFUNNELto filter by your app package and NetFUNNEL logs - This will show only NetFUNNEL-related log messages
- In the Logcat filter field, enter
-
Run Your App
- Run your app on a device or emulator
- Look for initialization success messages in Logcat:
YYYY-MM-DD HH:MM:SS.mmm PID-TID NetFUNNEL com.your.package.name D [NF4] Initialization successful. NetFUNNEL Version: {{version}}
Troubleshooting
If you encounter any issues during installation or initialization, please refer to the comprehensive Troubleshooting & FAQ guide for detailed solutions to common problems including:
- Installation Issues: AAR file loading, dependency resolution, build configuration
- Initialization Issues: Agent not initializing, manifest registration, bypass mode
- Function Call Errors: Initialization errors, callback issues, context problems
- Network & Connection Issues: Timeout errors, connectivity problems, server communication
- Build & Environment Issues: ProGuard/R8 configuration, Android version compatibility
For immediate help with common issues:
- Enable debug logging: Set
printLog = truein your initialization - Check Logcat: Filter by
package:mine NetFUNNELto see detailed logs - Verify configuration: Double-check all settings match your NetFUNNEL console
- Test with simple setup: Start with basic configuration first