Installation & Initialization
This guide covers the essential setup steps for integrating the NetFUNNEL iOS Agent into your application.
Prerequisites
System Requirements
| Component | Version | Notes |
|---|---|---|
| iOS | 12+ | Covers 99% of active iOS devices |
| Storyboard | Objective-C, Swift | For UIKit-based development |
| SwiftUI | Compatible | For SwiftUI-based development |
Step 1: Download SDK
1.1 Download from NetFUNNEL Console
- Log in to your NetFUNNEL console
- Navigate to Agent → Mobile Agent → iOS
- Click "Traffic Control Installation File" button
- Download the ZIP file:
netfunnel-ios-agent-{{version}}.zip
1.2 Extract Files
- Extract the ZIP file to get:
netfunnel-ios-agent-{{version}}/
├── netfunnel-ios-agent-debug/
│   └── netfunnel_ios.xcframework    // (for development)
└── netfunnel-ios-agent-release/
    └── netfunnel_ios.xcframework    // (for production)
- Development: Use debug xcframework
- Production: Use release xcframework
Step 2: Add Dependencies
2.1 Add Framework
-
Create
Frameworksfolder at your project root (same level as .xcodeproj file) -
Copy the appropriate xcframework to
Frameworks/:Project structure:
your-project/
├── YourProject/
│   ├── AppDelegate.swift
│   └── ...
├── Frameworks/
│   └── netfunnel_ios.xcframework   // (from debug or release folder)
└── YourProject.xcodeproj -
Register framework in Xcode:
- Select your project in Project Navigator
- Go to General → Frameworks, Libraries, and Embedded Content
- Click + → Add Files… → Select
netfunnel_ios.xcframework - Click Add
- Set Embed to Embed & Sign
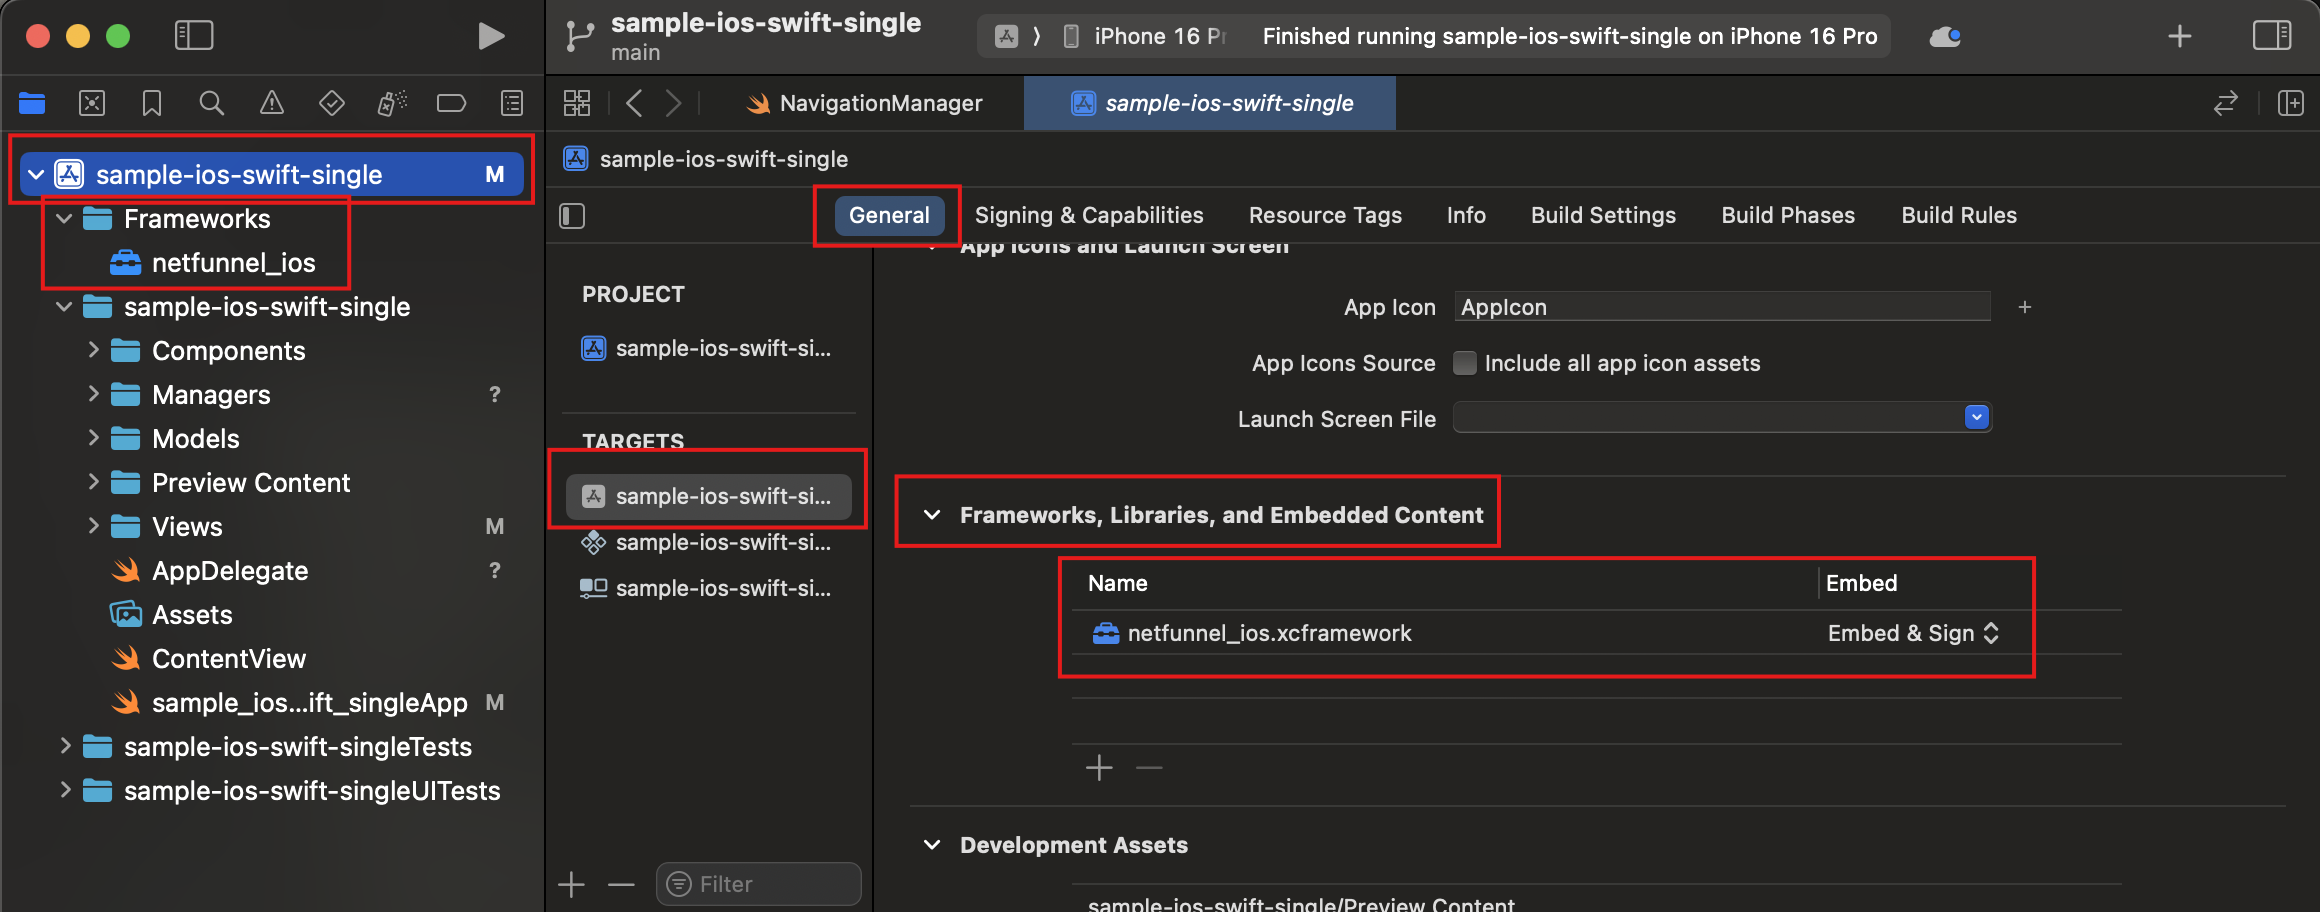
Make sure the framework appears without question marks (?). If you see a question mark, right-click → Source Control → Add netfunnel_ios.xcframework
2.2 Configure App Transport Security (if needed)
Only required if your NetFUNNEL server uses HTTP instead of HTTPS.
- Modern Xcode (SwiftUI Templates)
- Legacy Xcode (UIKit Templates)
For projects where Info.plist is hidden
- Select your app Target in Project Navigator
- Go to the Info tab
- Right-click any existing row → Add Row
- Enter "App Transport Security Settings" → Set as Dictionary
- Expand App Transport Security Settings → Add Row
- Enter "Allow Arbitrary Loads" → Set to "YES" (Boolean)
For projects with visible Info.plist files
- Right-click on
Info.plistfile - Select "Open As" → "Source Code"
- Add the following XML code:
<key>NSAppTransportSecurity</key>
<dict>
    <key>NSAllowsArbitraryLoads</key>
    <true/>
</dict>
Use NSExceptionDomains with specific server domains for production builds to avoid App Store review rejection.
2.3 Verify Setup
- Clean project: Product → Clean Build Folder (⌘+Shift+K)
- Build project: Product → Build (⌘+B)
Step 3: Initialize Agent
3.1 Create NetfunnelHandler Class
Before initializing NetFUNNEL, create a dedicated handler class for delegate methods:
- Create NetfunnelHandler files:
- Swift
- Objective-C
- Right-click on your project in Xcode
- Select New File → Swift File
- Name it
NetfunnelHandler - Add to project target when prompted
Important: After creating NetfunnelHandler.swift, you must register it with your project target. Xcode will prompt you to add it to the target - make sure to check the box for your app target.
Place NetfunnelHandler.swift in your main app folder alongside AppDelegate.swift.
- Right-click on your project in Xcode
- Select New File → Cocoa Touch Class
- Class:
NetfunnelHandler - Subclass of:
NSObject - Language: Objective-C
- Add to project target when prompted
Important: After creating NetfunnelHandler.h and NetfunnelHandler.m, you must register them with your project target. Xcode will prompt you to add them to the target - make sure to check the box for your app target.
Place NetfunnelHandler.h and NetfunnelHandler.m in your main app folder alongside AppDelegate.h and AppDelegate.m.
- Add the handler implementation:
- Swift
- Objective-C
//  NetfunnelHandler.swift
import Foundation
import Netfunnel_iOS

class NetfunnelHandler: NSObject, NetfunnelDelegate {
    static let shared = NetfunnelHandler()

    var onSuccess: ((String, String, Int, String) -> Void)?
    var onError: ((String, String, Int, String) -> Void)?
    var onNetworkError: ((String, String, Int, String) -> Void)?
    var onContinue: ((String, String, Int, String, Int, Int, String, Int) -> Void)?
    var onBlock: ((String, String, Int, String) -> Void)?
    var onClose: ((String, String, Int, String) -> Void)?
    var onComplete: ((String, String, Int, String) -> Void)?

    private override init() {
        super.init()
    }

    func nfSuccess(projectKey: String, segmentKey: String, statusCode: Int, message: String) {
        onSuccess?(projectKey, segmentKey, statusCode, message)
    }

    func nfError(projectKey: String, segmentKey: String, statusCode: Int, message: String) {
        onError?(projectKey, segmentKey, statusCode, message)
    }

    func nfNetworkError(projectKey: String, segmentKey: String, statusCode: Int, message: String) {
        onNetworkError?(projectKey, segmentKey, statusCode, message)
    }

    func nfContinue(projectKey: String, segmentKey: String, statusCode: Int, message: String,
                    aheadWait: Int, behindWait: Int, waitTime: String, progressRate: Int) {
        onContinue?(projectKey, segmentKey, statusCode, message, aheadWait, behindWait, waitTime, progressRate)
    }

    func nfBlock(projectKey: String, segmentKey: String, statusCode: Int, message: String) {
        onBlock?(projectKey, segmentKey, statusCode, message)
    }

    func nfClose(projectKey: String, segmentKey: String, statusCode: Int, message: String) {
        onClose?(projectKey, segmentKey, statusCode, message)
    }

    func nfComplete(projectKey: String, segmentKey: String, statusCode: Int, message: String) {
        onComplete?(projectKey, segmentKey, statusCode, message)
    }
}
//  NetfunnelHandler.h
#import <Foundation/Foundation.h>
#import <Netfunnel_iOS/Netfunnel_iOS.h>

@interface NetfunnelHandler : NSObject <NetfunnelDelegate>

+ (instancetype)sharedInstance;

@property (nonatomic, copy) void(^onSuccess)(NSString *projectKey, NSString *segmentKey, NSInteger statusCode, NSString *message);
@property (nonatomic, copy) void(^onError)(NSString *projectKey, NSString *segmentKey, NSInteger statusCode, NSString *message);
@property (nonatomic, copy) void(^onNetworkError)(NSString *projectKey, NSString *segmentKey, NSInteger statusCode, NSString *message);

@property (nonatomic, copy) void(^onContinue)(NSString *projectKey, NSString *segmentKey, NSInteger statusCode, NSString *message, NSInteger aheadWait, NSInteger behindWait, NSString *waitTime, NSInteger progressRate);
@property (nonatomic, copy) void(^onBlock)(NSString *projectKey, NSString *segmentKey, NSInteger statusCode, NSString *message);
@property (nonatomic, copy) void(^onClose)(NSString *projectKey, NSString *segmentKey, NSInteger statusCode, NSString *message);
@property (nonatomic, copy) void(^onComplete)(NSString *projectKey, NSString *segmentKey, NSInteger statusCode, NSString *message);

@end

//  NetfunnelHandler.m
#import "NetfunnelHandler.h"

@implementation NetfunnelHandler

+ (instancetype)sharedInstance {
    static NetfunnelHandler *sharedInstance = nil;
    static dispatch_once_t onceToken;
    dispatch_once(&onceToken, ^{
        sharedInstance = [[self alloc] init];
    });
    return sharedInstance;
}

- (void)nfSuccessWithProjectKey:(NSString *)projectKey
                    segmentKey:(NSString *)segmentKey
                    statusCode:(NSInteger)statusCode
                       message:(NSString *)message {
    if (self.onSuccess) {
        self.onSuccess(projectKey, segmentKey, statusCode, message);
    }
}

- (void)nfErrorWithProjectKey:(NSString *)projectKey
                  segmentKey:(NSString *)segmentKey
                  statusCode:(NSInteger)statusCode
                     message:(NSString *)message {
    if (self.onError) {
        self.onError(projectKey, segmentKey, statusCode, message);
    }
}

- (void)nfNetworkErrorWithProjectKey:(NSString *)projectKey
                         segmentKey:(NSString *)segmentKey
                         statusCode:(NSInteger)statusCode
                            message:(NSString *)message {
    if (self.onNetworkError) {
        self.onNetworkError(projectKey, segmentKey, statusCode, message);
    }
}

- (void)nfContinueWithProjectKey:(NSString *)projectKey
                      segmentKey:(NSString *)segmentKey
                      statusCode:(NSInteger)statusCode
                         message:(NSString *)message
                       aheadWait:(NSInteger)aheadWait
                      behindWait:(NSInteger)behindWait
                        waitTime:(NSString *)waitTime
                     progressRate:(NSInteger)progressRate {
    if (self.onContinue) {
        self.onContinue(projectKey, segmentKey, statusCode, message, aheadWait, behindWait, waitTime, progressRate);
    }
}

- (void)nfBlockWithProjectKey:(NSString *)projectKey
                  segmentKey:(NSString *)segmentKey
                  statusCode:(NSInteger)statusCode
                     message:(NSString *)message {
    if (self.onBlock) {
        self.onBlock(projectKey, segmentKey, statusCode, message);
    }
}

- (void)nfCloseWithProjectKey:(NSString *)projectKey
                  segmentKey:(NSString *)segmentKey
                  statusCode:(NSInteger)statusCode
                     message:(NSString *)message {
    if (self.onClose) {
        self.onClose(projectKey, segmentKey, statusCode, message);
    }
}

- (void)nfCompleteWithProjectKey:(NSString *)projectKey
                     segmentKey:(NSString *)segmentKey
                     statusCode:(NSInteger)statusCode
                        message:(NSString *)message {
    if (self.onComplete) {
        self.onComplete(projectKey, segmentKey, statusCode, message);
    }
}

@end
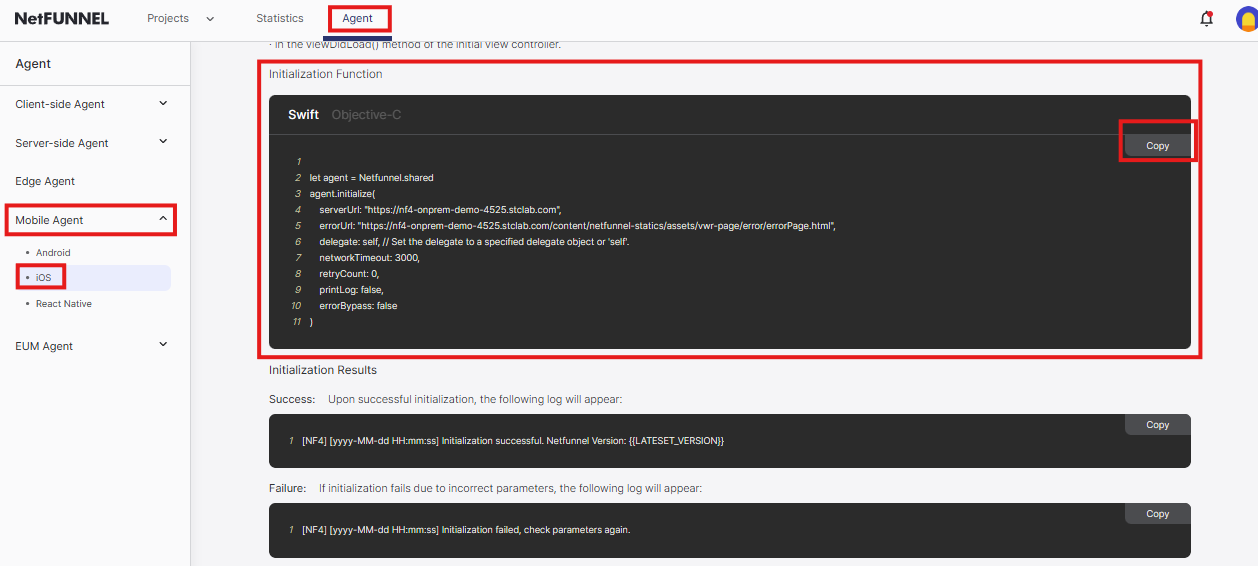
3.2 Get Initialization Code from NetFUNNEL Console
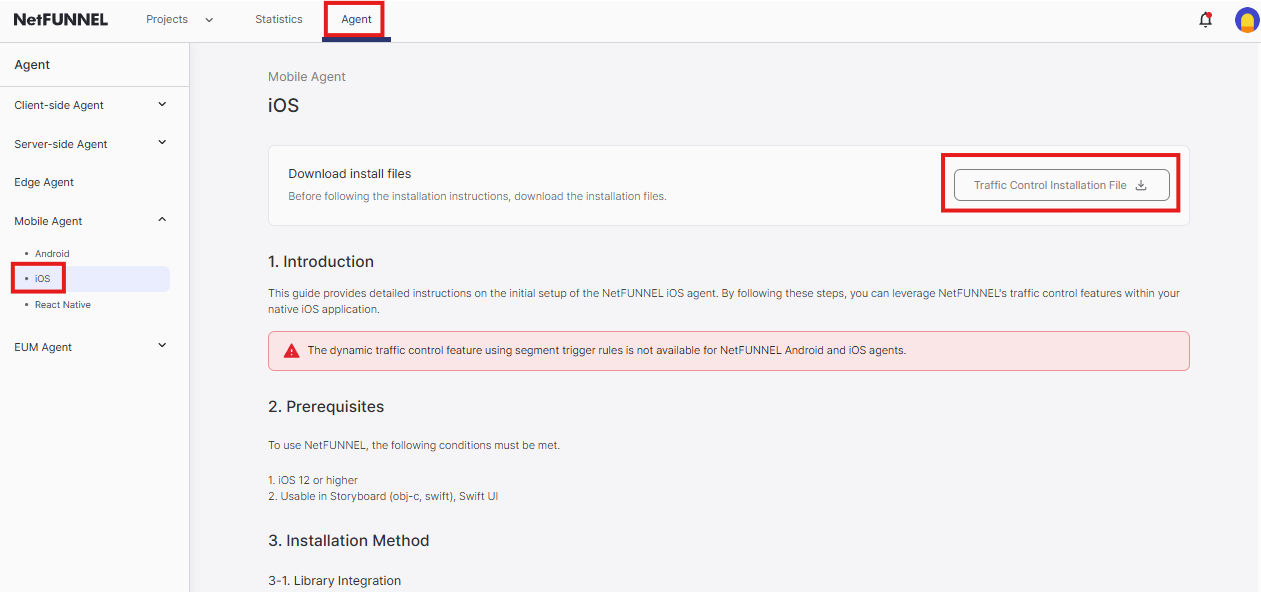
- Log in to your NetFUNNEL console
- Navigate to Agent → Mobile Agent → iOS
- Copy the initialization code with your actual server URLs
3.3 Initialize in AppDelegate
Initialize in application(_:didFinishLaunchingWithOptions:) at the beginning of the method. Missing this step = bypass mode (no protection).
3.3.1 Check Your Project Type
- UIKit Projects: ✅ You already have AppDelegate - Skip to 3.3.3
- SwiftUI Projects: ⚠️ You need to create AppDelegate - Follow 3.3.2
3.3.2 Create AppDelegate (SwiftUI Only)
Create AppDelegate File
- Swift
- Objective-C
- Right-click on your project in Xcode
- Select New File → Swift File
- Name it
AppDelegate
- Right-click on your project in Xcode
- Select New File → Cocoa Touch Class
- Class:
AppDelegate, Subclass of:NSObject
Connect to SwiftUI
- Swift
- Objective-C
Open your main App file (e.g., YourAppNameApp.swift) and add:
// YourAppNameApp.swift
import SwiftUI

@main
struct YourAppNameApp: App {
    @UIApplicationDelegateAdaptor(AppDelegate.self) var appDelegate

    var body: some Scene {
        WindowGroup {
            ContentView()
        }
    }
}
For Objective-C projects with SwiftUI, you still need a Swift App file:
// YourAppNameApp.swift (Swift file in Objective-C project)
import SwiftUI

@main
struct YourAppNameApp: App {
    @UIApplicationDelegateAdaptor(AppDelegate.self) var appDelegate

    var body: some Scene {
        WindowGroup {
            ContentView()
        }
    }
}
3.3.3 Add Initialization Code
Copy the initialization code from NetFUNNEL Console and add it to your AppDelegate file:
- Copy from Console: Use the initialization code you copied from NetFUNNEL Console (3.2)
- Add to AppDelegate: Paste it into the
application(_:didFinishLaunchingWithOptions:)method
- Swift
- Objective-C
Open AppDelegate.swift and add the initialization code to the application(_:didFinishLaunchingWithOptions:) method:
// AppDelegate.swift
import UIKit
import Netfunnel_iOS

class AppDelegate: UIResponder, UIApplicationDelegate {

    func application(_ application: UIApplication, didFinishLaunchingWithOptions launchOptions: [UIApplication.LaunchOptionsKey: Any]?) -> Bool {

        // Paste your NetFUNNEL Console initialization code here
        Netfunnel.initialize(
            clientId: "{{CLIENT_ID}}",
            delegate: self // Set the delegate to a specified delegate object or 'self'.
        )

        return true
    }
}
Open AppDelegate.m and add the initialization code to the application:didFinishLaunchingWithOptions: method:
// AppDelegate.m
#import <UIKit/UIKit.h>
#import <Netfunnel_iOS/Netfunnel.h>

@interface AppDelegate : UIResponder <UIApplicationDelegate>
@end

@implementation AppDelegate

- (BOOL)application:(UIApplication *)application didFinishLaunchingWithOptions:(NSDictionary *)launchOptions {

    // Paste your NetFUNNEL Console initialization code here
    [agent initializeWithClientId:@"{{CLIENT_ID}}"
                                delegate:self];

    return YES;
}

@end
3.3.4 Modify Initialization Parameters
Important changes you need to make:
-
Change delegate parameter:
- Console code:
delegate: self(Swift) ordelegate:self(Objective-C) - Change to:
delegate: NetfunnelHandler.shared(Swift) ordelegate:[NetfunnelHandler sharedInstance](Objective-C)
- Console code:
-
Enable debug logging for testing:
- Change:
printLog: false→printLog: true - Purpose: See NetFUNNEL logs in Xcode Console for debugging
- Change:
Modified AppDelegate code:
- Swift
- Objective-C
// AppDelegate.swift - Modified version
import UIKit
import Netfunnel_iOS

class AppDelegate: UIResponder, UIApplicationDelegate {

    func application(_ application: UIApplication, didFinishLaunchingWithOptions launchOptions: [UIApplication.LaunchOptionsKey: Any]?) -> Bool {

        Netfunnel.initialize(
            clientId: "{{CLIENT_ID}}",
            delegate: NetfunnelHandler.shared  // Changed from 'self'
        )

        return true
    }
}
// AppDelegate.m - Modified version
#import <UIKit/UIKit.h>
#import <Netfunnel_iOS/Netfunnel.h>

@interface AppDelegate : UIResponder <UIApplicationDelegate>
@end

@implementation AppDelegate

- (BOOL)application:(UIApplication *)application didFinishLaunchingWithOptions:(NSDictionary *)launchOptions {

    [agent initializeWithClientId:@"{{CLIENT_ID}}"
                                delegate:[NetfunnelHandler sharedInstance]];  // Changed from 'self'

    return YES;
}

@end
Remember to set printLog: false in production builds for better performance and security.
Replace the placeholder {{CLIENT_ID}} with your actual client ID from the NetFUNNEL console.
Advanced: Exception Handling
For production apps, add try-catch error handling and set printLog: false:
- Swift
- Objective-C
import UIKit
import Netfunnel_iOS

class AppDelegate: UIResponder, UIApplicationDelegate {

    func application(_ application: UIApplication, didFinishLaunchingWithOptions launchOptions: [UIApplication.LaunchOptionsKey: Any]?) -> Bool {

        do {
            try Netfunnel.initialize(
                clientId: "{{CLIENT_ID}}",
                delegate: NetfunnelHandler.shared
            )
        } catch {
            print("NetFUNNEL initialization failed: \(error)")
            // Handle error: show error screen or exit app
        }

        return true
    }
}
#import <UIKit/UIKit.h>
#import <Netfunnel_iOS/Netfunnel.h>

@interface AppDelegate : UIResponder <UIApplicationDelegate>
@end

@implementation AppDelegate

- (BOOL)application:(UIApplication *)application didFinishLaunchingWithOptions:(NSDictionary *)launchOptions {

    @try {
        [agent initializeWithClientId:@"{{CLIENT_ID}}"
                                delegate:[NetfunnelHandler sharedInstance]];
    } @catch (NSException *exception) {
        NSLog(@"NetFUNNEL initialization failed: %@", exception.reason);
        // Handle error: show error screen or exit app
    }

    return YES;
}

@end
Required Parameters
| Parameter | Type | Required | Description |
|---|---|---|---|
clientId | String | Yes | Client ID from NetFUNNEL console |
delegate | NetfunnelDelegate | Yes | Delegate object implementing protocol |
Missing clientId = bypass mode (no waiting room protection)
For additional initialization parameters like networkTimeout, retryCount, printLog, and more, see the Configuration Options Reference.
Step 4: Build and Verify Installation
Now that you've completed the SDK setup and initialization, let's build your project and verify that NetFUNNEL is working correctly.
4.1 Build Your Project
Sync and Build
-
Clean Project
- Go to
Product→Clean Build Folder - Wait for cleaning to complete
- Go to
-
Build Project
- Press
⌘+Bor go toProduct→Build - Monitor the Issue Navigator for any errors
- Press
Verify Build Success
-
Check Build Output
- Ensure no compilation errors in the Issue Navigator
- Look for successful framework linking messages
- Verify NetFUNNEL framework is properly included
-
Verify Dependencies
- In the Project Navigator, expand your project
- Confirm you see
netfunnel_ios.xcframeworklisted - Check that the framework appears without question marks
4.2 Test NetFUNNEL Initialization
Enable Debug Logging
To verify NetFUNNEL is initializing correctly, temporarily enable debug logging in your AppDelegate:
Remember to set printLog = false in production builds for better performance and security.
- Swift
- Objective-C
//  AppDelegate.swift
Netfunnel.initialize(
    clientId: "{{CLIENT_ID}}",
    delegate: NetfunnelHandler.shared
)
//  AppDelegate.m
[agent initializeWithClientId:@"{{CLIENT_ID}}"
                                delegate:[NetfunnelHandler sharedInstance]];
Monitor Console Output
-
Open Console
- Go to
View→Debug Area→Activate Console(⌘+Shift+Y) - Or click the
Consoletab in the bottom panel
- Go to
-
Filter NetFUNNEL Logs
- In the console filter field, enter
NetFUNNELto filter by NetFUNNEL logs - This will show only NetFUNNEL-related log messages
- In the console filter field, enter
-
Run Your App
- Run your app on a device or simulator
- Look for initialization success messages in Console:
[NF4] Initialization successful. NetFUNNEL Version: {{version}}
Troubleshooting
If you encounter any issues during installation or initialization, please refer to the comprehensive Troubleshooting & FAQ guide for detailed solutions to common problems including:
- Installation Issues: Framework loading, project configuration, build settings
- Initialization Issues: Agent not initializing, delegate registration, bypass mode
- Function Call Errors: Initialization errors, callback issues, context problems
- Network & Connection Issues: Timeout errors, connectivity problems, server communication
- Build & Environment Issues: Xcode configuration, iOS version compatibility
For immediate help with common issues:
- Check Console: Filter by
NetFUNNELto see detailed logs - Verify configuration: Double-check all settings match your NetFUNNEL console
- Test with simple setup: Start with basic configuration first
- Verify client ID: Ensure your client ID matches the one from NetFUNNEL console